Introduction to Dart VM
翻译自 Dart VM,非常详细地介绍了 Dart 代码运行机制。
Dart VM 是一个用于原生地执行 Dart 代码的组件集合。它主要包含如下部分:
- 运行时系统
- 对象模型
- GC
- Snapshot
- 核心库
- 通过 service protocol 访问的 Development Experience 组件
- 调试
- 分析
- 热加载
- Just-in-Time (JIT) 和 Ahead-of-Time (AOT) 编译流水线
- 解释器
- ARM 模拟器
Dart VM 这个名字是历史遗留的。在某种意义上 Dart VM 能为上层编程语言提供执行环境,但这个名字并不意味着 Dart VM 中 Dart 代码总是解释执行或 JTI 编译的。比如,可以使用 Dart VM AOT 流水线将 Dart 代码编译成机器码,然后在精简版本的 Dart VM 中执行,称之为 precompiled runtime,它既不包含任何编译器组件,也不能动态加载 Dart 源码。
Dart VM 是如何运行代码的?
Dart VM 有多种方式执行代码,比如:
- 使用 JIT 从源码或 Kernel binary
- 从 snapshot
- AOT snapshot
- AppJIT snapshot
这些方式之间的主要不同在于 VM 将 Dart 源码转换成可执行代码的时机和方式。执行代码的运行时环境是相同的。
VM 中的 Dart 代码运行在 isolate,对 isolate 的最好描述是这样的:一个隔离的 Dart 世界,有其自己的内存(heap),通常有自己的线程(mutator thread)。可以有多个 isolate 并发执行 Dart 代码,但 isolate 不能直接共享任何状态,只能通过 port 发送消息来通信(不要将这里的 port 跟 network port 混淆)。

OS 线程跟 isolate 之间的关系比较模糊,具体依赖于 VM 是如何 embed 到应用中的。只能保证如下几个规则:
- OS 线程同一时刻只能进入一个 isolate。如果线程想进入另一个 isolate,它必须离开当前 isolate
- 同一时刻一个 isolate 只能有一个 mutator 线程。mutator 线程是指执行 Dart 代码并能访问 VM 公开 C API 的线程
当然,同一个 OS 线程可以先进入一个 isolate,执行 Dart 代码,然后离开这个 isolate 并进入另一个 isolate。类似的,多个不同的线程可以进入同一个 isolate 并执行代码,只要不是同时发生。
除了单个 mutator 线程外,一个 isolate 还能跟多个辅助线程关联,比如:
- 一个后台运行的 JIT 编译器线程
- 多个 GC sweeper 线程
- 多个并发 GC maker 线程
VM 内部使用线程池(ThreadPool)管理 OS 线程,代码围绕 ThreadPool::Task 而非 OS 线程来组织。比如,GC VM 向全局 VM 线程池提交 SweeperTask 后并不是生成一个专门的线程来执行后台清理工作,线程池可能会选择一个空闲的线程,或者在没有线程可用时生成一个新线程。类似的,用于 isolate 消息处理的 event loop 的缺省实现也并不是真的生成专门的 event loop 线程,而是在新消息到达时向线程池提交 MessageHandlerTask。
源码清单:
- Isolate 类代表 isolate
- Heap 类代表 isolate 的 heap
- Thread 类描述与 isolate 关联的线程的状态。注意这里的名字 Thread 容易让人混淆,因为实际上所有作为 mutator 关联到同一个 isolate 的所有的操作系统线程会重用同一个 Thread 实例。
- Dart_RunLoop 和 MessageHandler 是 isolate 消息处理的缺省实现
JIT 模式源码运行
这一节是关于在命令行下执行 Dart 时的过程。
1 | // hello.dart |
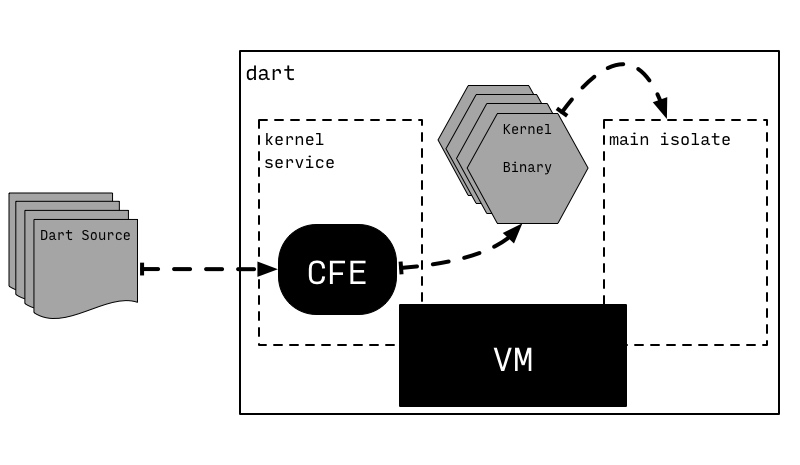
Dart 2 开始 VM 不再支持直接从原始代码执行 Dart,而是执行指定的 Kernel binaries (也称之为 dill files),其中包含系列化后的 Kernel ASTs。Dart 源码转换成 Kernel AST 的任务由 common front-end (CFE) 完成,CFE 由 Dart 写成,在不同的 Dart 工具共享(比如 VM,dart2js,Dart Dev Compiler)。

为了保留直接执行 Dart 代码的便捷性,标准的 dart 执行命令带有一个叫 kernel service 的 isolate,它负责将 Dart 源码编译成 Kernel binary。之后 VM 后运行生成的 Kernel binary。
不过这并非 CFE 和 VM 运行 Dart 代码唯一的组合方式。比如,Flutter 完全将 compilation to Kernel 和 execution from Kernel 两个过程分离到不同的设备上:编译发生在开发机(host),而执行发生在移动设备(device),它接收通过 flutter tool 发送来的 Kernel binary。
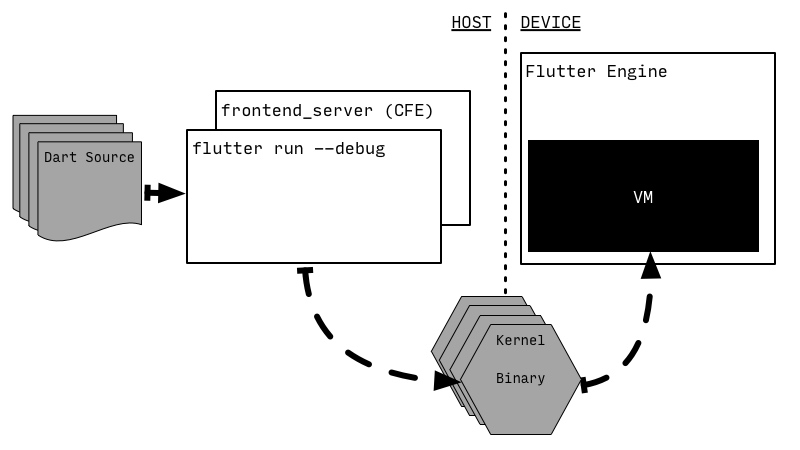

注意 flutter tool 自己并不解析 Dart,它启动另一个进程 frontend_server。frontend_server 是对 CFE 的包装,并且进行某些 Flutter 特定的 Kernel-to-Kernel 转换。frontend_server 将 Dart 代码转换成 Kernel binary 文件,flutter tool 将这些文件发送到设备。当开发者想使用 hot reload 特性时,就需要 frontend_server 是常驻进程了:frontend_server 可以根据前一次编译来重用 CFE 状态,只编译发生实际变动的代码。
Kernel binary 加载到 VM 后会被解析成代码不同程序实体的对象。不过解析是延迟进行的:最初只加载库和类的基本信息。每个来自 Kernel binary 的实体都有一个指向 Kernel binary 的指针,以便之后需要时能加载更多信息。
使用
Raw...前缀来指代 VM 内部分配的特定对象。这是 VM 的命名习惯:VM 内部对象布局由一个位于raw_object.h头文件中以 Raw 开头的 C++ 类来定义。比如RawClass是一个描述 Dart 类的 VM 对象,而RawField是一个描述 Dart 类中 Dart 字段的对象。在后台讨论运行时系统和对象模型那节中我们还会回到这个话题。
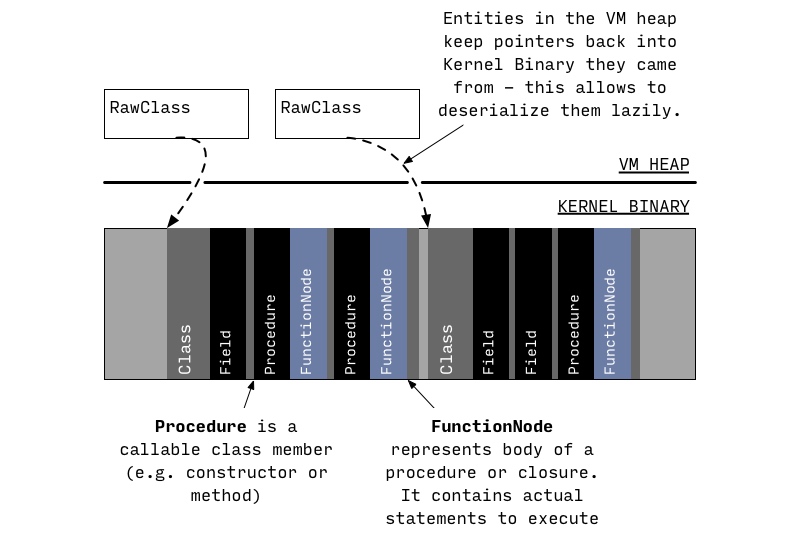
类的信息只在之后运行时需要时才完全反序列化(比如,查找类成员,分配对象等等)。这一阶段,类成员读取自 Kernel binary。不过,此时只有成员签名,完整的函数方法此时并没有完全反序列化。
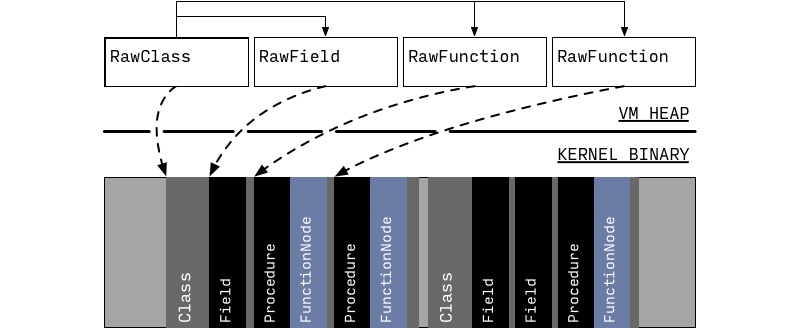
这时运行时已经从 Kernel binary 加载了足够信息,可以成功解析和调用方法。比如,它可以从一个库中解析和调用 main 函数。
源码清单:
- package:kernel/ast.dart 定义了描述 Kernel AST 的类
- package:front_end 用于解析 Dart 源码并从源码构建 AST
- kernel::KernelLoader::LoadEntireProgram 是将 Kernel AST 反序列化成对应 VM 对象的入口
- pkg/vm/bin/kernel_service.dart 实现了 Kernel Service isolate
- runtime/vm/kernel_isolate.cc 将 Dart 实现跟 VM 的其他部分粘合起来
- package:vm 包含基于 Kernel 的 VM 的大部分功能,比如不同的 Kernel-to-Kernel 转换,由于一些历史原因一些 VM 特定的转换仍然放在 package:kernel 中
- package:kernel/transformations/continuation.dart 是一个复杂转换的好例子,它对
async、async*以及sync*函数进行脱糖处理
动手尝试!如果你对 Kernel binary 格式以及 VM 用法感兴趣,可以使用 pkg/vm/bin/gen_kernel.dart 来从 Dart 源码生成一个 Kernel binary 文件。生成的 binary 文件可以使用 pkg/vm/bin/dump_kernel.dart 进行 dump 操作。
1 | # Take hello.dart and compile it to hello.dill Kernel binary using CFE. |
当你尝试使用 gen_kernel.dart 时你你发现它需要一个名为 platform 的东西,这个参数用于指定一个包含所有核心库(例如 dart:core,dart:async)的 AST 的文件。如果你本地编译过 Dart SDK,可以使用 out 目录下的 platform 文件,比如 out/ReleaseX64/vm_platform_strong.dill。(译者注:如果你本地编译过 Flutter 引擎,也可以使用 engine/src/out/host_debug_unopt/vm_platform_strong.dill)。另外,你也可以使用 pkg/front_end/tool/_fasta/compile_platform.dart 生成 platform。
1 | # Produce outline and platform files using the given libraries list. |
译者注:我在本地操作了一把,成功!
1 | # 生成 dill |


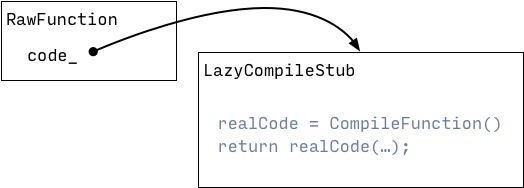
所有函数体初始时只有占位符而不是实际的可执行代码:占位符指向 LazyCompileStub,它只是请求运行时系统为当前函数生成可执行代码并且对新生成的代码进行尾调用(tail-calls this newly generated code)。
函数第一次编译时以上过程由 unoptimizing compiler 完成。
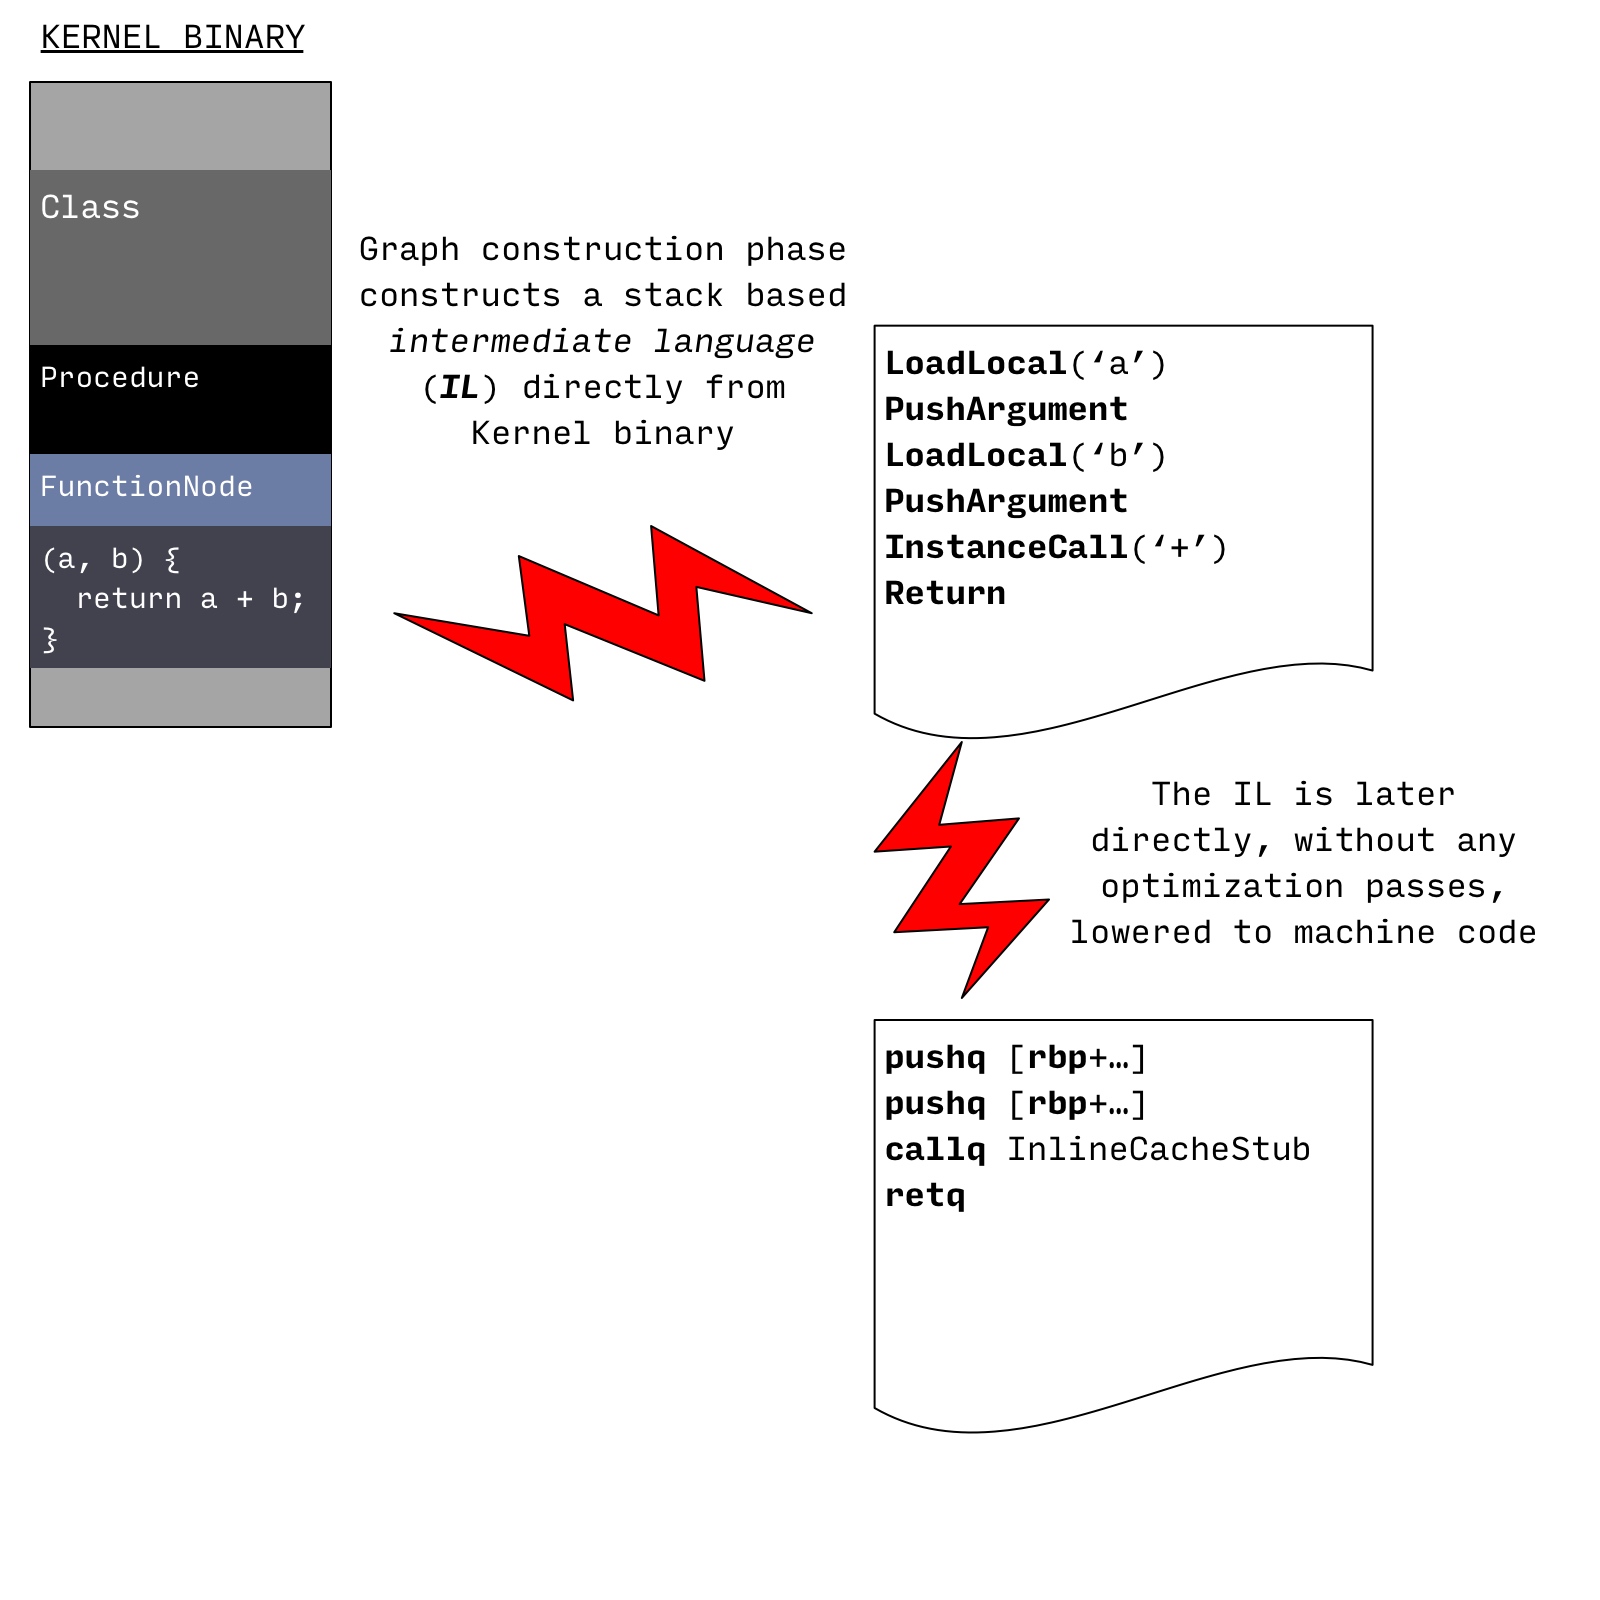
Unoptimizing compiler 按以下两个步骤生成机器码:
- 遍历函数体的序列化后的 AST,为函数体生成 control flow graph (CFG)。CFG 由 intermediate language (IL) 指令块组成。这个阶段使用的 IL 指令类似基于栈的 VM 中的指令:从栈中取出操作数,执行操作后将结果放回同一个栈 (注意:实际上并不是所有的函数都有实际的 Dart/Kernel AST 函数体,比如 C++ 中定义的 native 方法或 artificial tear-off functions generated by Dart VM,这些场景中 IL 是从从头构造的而不是从 Kernel AST 生成的)
- 生成的 CFG 直接编译成机器码:每个 IL 指令扩展成多个机器语言指令
这个阶段中没有进行优化,unoptimizing compiler 的主要目标是快速生成可执行代码。
This also means that unoptimizing compiler does not attempt to statically resolve any calls that were not resolved in Kernel binary, so calls (MethodInvocation or PropertyGet AST nodes) are compiled as if they were completely dynamic. VM 目前不使用任何形式的基于的 virtual table 或 interface table 的分发方法,而是使用 inline caching 实现动态调用。
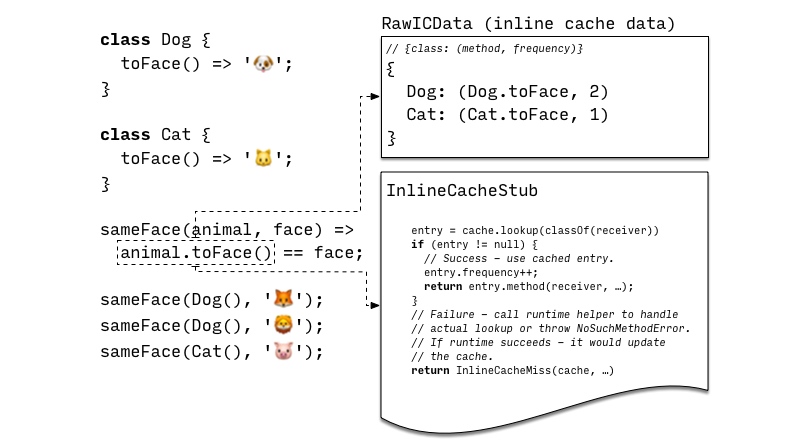
inline caching 背后的主要思想是在 call site specific cache 中保存方法解析的结果(The core idea behind inline caching is to cache results of method resolution in a call site specific cache.)。注意:原始的 inline caching 实现实际上是用来对函数的 native 代码打补丁。VM 使用的 inline caching 有如下组成:
- call site specific cache (RawICData 对象),将接收方的类映射成方法,如果接收方的类匹配上就调用这个方法。这个 cache 还保存一些辅助信息,比如调用计数,用于记录指定类在这个 call site 中出现的次数
- shared lookup stub,实现方法调用的快捷路径。该 stub 在指定 cache 中检查是否包含能跟接收方的类匹配的 entry,如果有,则 stub 将增调用频率计数。否则,stub 将请求运行时系统进行方法解析。解析方法后会更新 cache,之后的方法调用不必再经过运行时系统。
下图展示了跟 animal.toFace() call site 关联的 inline cache 的结构和方法,这个方法在一个 Dog 实例上执行两次,在另一个 Cat 实例上执行一次。
Unoptimizing compiler 本身足够执行任意 Dart 代码。但它生成的代码非常慢,这也是为什么 VM 还实现了 adaptive optimizing 编译流水线。adaptive optimizing 背后的思想是对一个运行中的程序的执行分析结果来驱动优化决策:
unoptimized code (未经优化的代码) 运行时会收集以下信息:
- dynamic call site 对应的 inline cache 收集接收者的类型信息
- 每个函数和块的执行计数器记录代码热点
当一个函数的执行计数数达到某个阈值时,该函数被提交给 background optimizing compiler 进行优化。
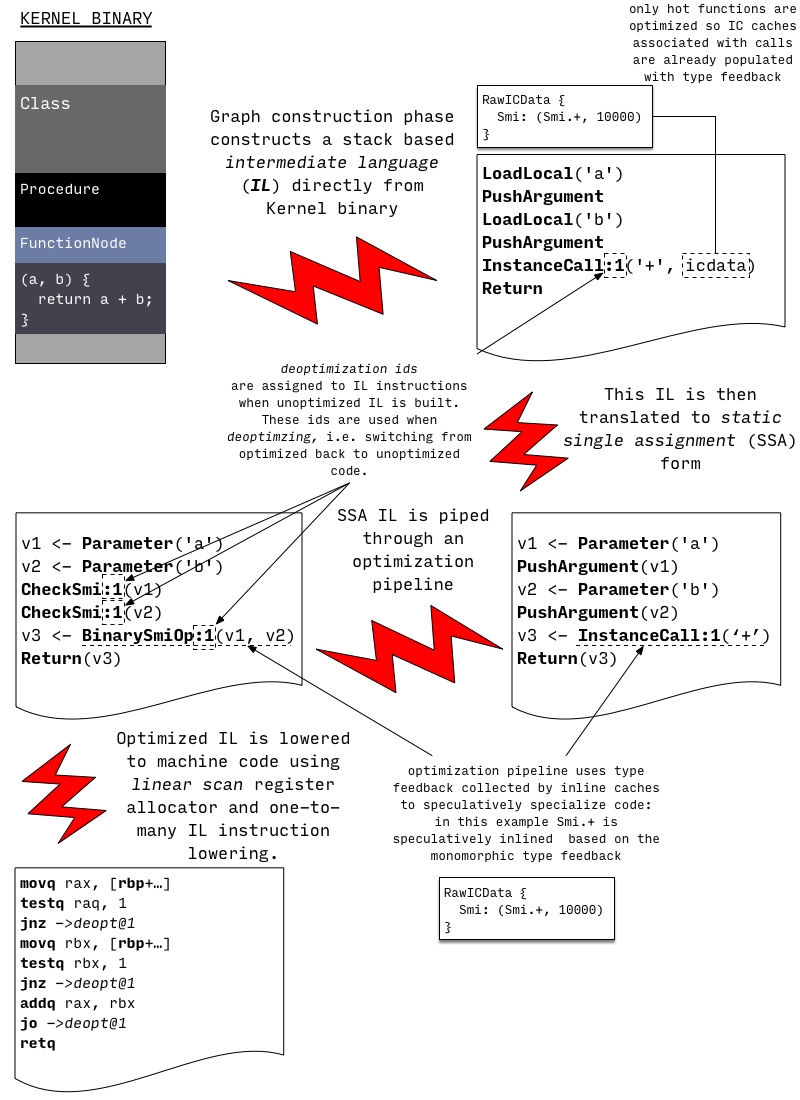
优化编译以跟未优化编译相同的方式开始:遍历序列化后的 Kernel AST 来为待优化的函数构建未优化的 IL。不过,现在跟直接将 unoptimized IL 转成机器码不同的是,optimizing compiler 将 unoptimized IL 转换成 static single assignment (SSA) 格式的 optimized IL。SSA 格式的 IL 接下来会基于收集到的类型反馈来进行一系列常规的以及 Dart 特有的优化:比如 e.g. inlining, range analysis, type propagation, representation selection, store-to-load and load-to-load forwarding, global value numbering, allocation sinking, etc. 最后,使用 linear scan register allocator 将 optimized IL 转换成机器码。
优化编译完成后 background compiler 要求 mutator thread 进入一个安全点,并且将优化后的代码关联到待优化的函数。下次函数执行时,它将使用优化后的代码。
注意:有些函数包含长时间执行的循环,所以在函数运行期间从 unoptimized code 切换到 optimized code 也是有意义的。这个过程称为 on stack replacement (OSR),它的名字来自于这样一个事实:栈帧从函数的某个版本被透明地替换成同一函数的另一个版本。
源码清单:
- 编译器源码见 runtime/vm/compiler 目录
- 编译流水线入口见 CompileParsedFunctionHelper::Compile
- IL 由 runtime/vm/compiler/backend/il.h 定义
- Kernel-to-IL 的转换从 kernel::StreamingFlowGraphBuilder::BuildGraph 开始
- StubCode::GenerateNArgsCheckInlineCacheStub 为 inline-cache stub 生成机器码,InlineCacheMissHandler 处理 IC 缺失
- runtime/vm/compiler/compiler_pass.cc 定义 optimizing compiler pass 和 order
- JitCallSpecializer 完成大部分 type-feedback based specialization
动手尝试!VM 提供一些选项用于控制 JIT,并能 dump 由 JIT 编译的函数的 IL 和机器码.
Flag Description
–print-flow-graph[-optimized] Print IL for all (or only optimized) compilations
–disassemble[-optimized] Disassemble all (or only optimized) compiled functions
–print-flow-graph-filter=xyz,abc,… Restrict output triggered by previous flags only to the functions which contain one of the comma separated substrings in their names
–compiler-passes=… Fine control over compiler passes: force IL to be printed before/after a certain pass. Disable passes by name. Pass help for more information
–no-background-compilation Disable background compilation, and compile all hot functions on the main thread. Useful for experimentation, otherwise short running programs might finish before background compiler compiles hot function
例如,
1 | # Run test.dart and dump optimized IL and machine code for |
另外需要强调的是 optimizing compiler 是基于对应用执行结果分析而得出的假设来生成优化后的代码的。比如,观察到动态调用只将 C 类作为接收者,会将这个动态调用转换成直接调用,并验证接收者的类型为 C。但是,后续的调用可能打破这种假设:
1 | void printAnimal(obj) { |
任何时候如果 optimized code 做了某种假设,但这些假设并不来自静态不可变信息,则应该防范假设被打破,并且能在打破假设的场景中恢复。
这种恢复过程称为 deoptimization (反优化):无论何时当 optimized code 不能处理某种 case 时,简单地切换成 unoptimized code 对应的匹配点并继续执行。unoptimized code 没有做任何假设,所以能处理任何可能的输入。
注意:进入 unoptimized 函数正确的执行点非常重要,因为方法有副作用。比如上面的例子中,deoptimization 发生在调用第一个
VM 通常会在 deoptimization 发生时抛弃函数的 optimized 版本,并且在之后使用更新后的 type feedback 重新进行优化。
VM 有两种方式来防范编译做出的假设被破坏:
- inline check (比如,
CheckSmi和CheckClassIL 指令) 用于在编译器做出假设的 use site 中验证假设仍然成立。比如,将动态调用转换成直接调用时编译器会在直接调用前增加检查。检查失败时发生的 deoptimization 被称为 eager deoptimization,因为检查后它马上发生 - 全局守卫,用于提示运行时在 optimized code 依赖的东西被修改后抛弃这些 optimized code。比如,optimizing compiler 可能发现
C类没有被其他类继承,并且在类型传递时使用了这个信息。但是接下来动态加载的代码可能引入了一个继承自C类的类,所以之前假设不成立。这时运行时需要抛弃所有基于C类没有子类这个假设优化得到的 optimized code。运行时可能发现某些失效的 optimized code 在执行栈中,这种情况下受影响的栈帧需要被标记以反优化。这种 deoptimization 称为 lazy deoptimization:因为它会延迟到控制流回到 optimized code 时才发生
代码清单:
Deoptimizer 机制见 runtime/vm/deopt_instructions.cc。它实际上是一个用于 deoptimization instructions 的迷你解释器,用于描述从 optimized code 状态重建必要的 unoptimized code 状态
Deoptimization 指令由 CompilerDeoptInfo::CreateDeoptInfo 为 optimized code 中每个潜在的 deoptimization location 生成 deoptimization 指令
--trace-deoptimization用于 VM 输出每个 deoptimization 的原因和位置--trace-deoptimization-verbose用于 VM 为每个 deoptimization instruction 输出一行日志
从 snapshot 运行
VM 具备对 isolate 堆(更准确地说是堆中的对象图)序列化成二进制 snapshot 的能力。snapshot 可用于启动 VM isolate 时重建相同状态。
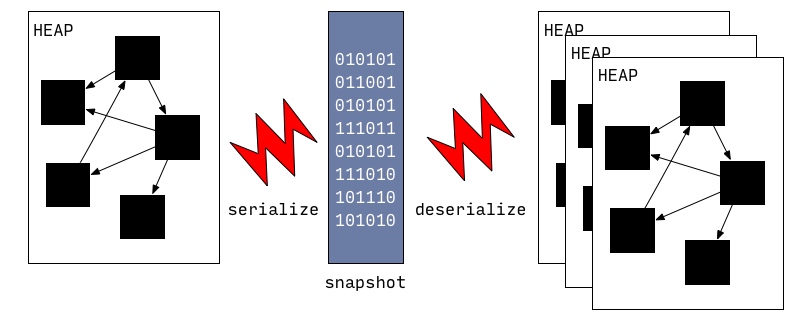
snapshot 使用低级格式,便于快速启动。它实际上是待创建对象的列表,以及如何联系这些对象的指令。snapshot 背后的初始思想是:相比解析 Dart 源码来逐步创建 VM 内部数据结构,VM 可以快速从 snapshot 得到所有必要的数据结构来启动 isolate。
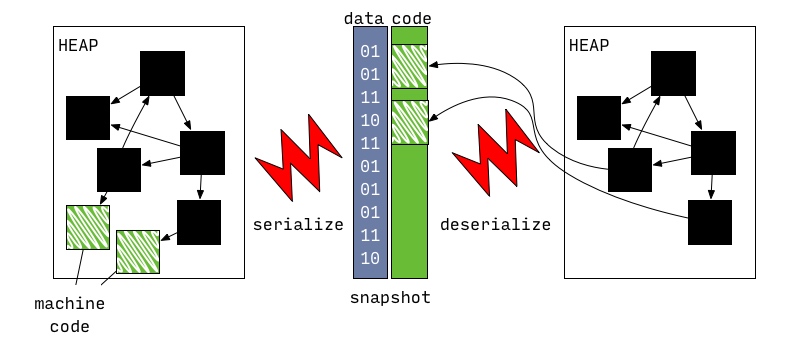
最初,snapshot 中并不包含机器码。后来随着 AOT compiler 的开发,snapshot 中也可包含机器码。开发 AOT compiler 以及 snapshots-with-code 的目的是允许 VM 用于 JITing 不可用(平台本身限制)的那些平台。
snapshots-with-code 跟普通 snapshot 几乎相同,一个小的区别在于:前者包含一个 code section,这个区域跟其他区域不同,并不需要反序列化。code section 允许映射到内存时直接作为 heap 的一部分。
代码清单:
- runtime/vm/clustered_snapshot.cc 处理 snapshot 的序列化与反序列化。有一系列 Dart_CreateXyzSnapshot[AsAssembly] 方法用于将 heap 导出成 snapshot,例如 Dart_CreateAppJITSnapshotAsBlobs 和 Dart_CreateAppAOTSnapshotAsAssembly
从 AppJIT snapshot 运行
引入 AppJIT snapshot 是为解决大型 Dart 应用的启动时间,例如 dartanalyzer 或 dart2js。这些工具用于小工程时完成实际工作的时间跟 VM 花在 JIT 上的时间一样多(译者注:言下之意是,VM 花了太多时间对大型 Dart 应用进行 JIT 处理,而这些应用用于处理小工程时实际工作本身并不会耗时太多?)
AppJIT snapshot 可用于处理这种问题:一个应用可以在 VM 使用一些模拟的训练数据运行,之后将生成的代码和 VM 内部数据结构序列化成 AppJIT snapshot。不同于以源码和 Kernel binary 形式来分发应用,而是分发 AppJIT snapshot。当在实际数据上执行时的 execution profile 无法匹配到训练阶段时观察到的 execution profile,从这种 snapshot 启动的 VM 仍然可以 JIT—

动手尝试!给 dart 命令传 --snapshot-kind=app-jit --snapshot=path-to-snapshot 参数会生成 AppJIT snapshot。如下的例子为 dart2js 生成和使用 AppJIT snapshot。
1 | # Run from source in JIT mode. |
从 AppAOT snapshot 运行
AOT snapshot 初始是为无法开启 JIT 编译的平台引入的,但它们也可用于快速启动以及性能强一致性(可接受潜在性能损失)的场景。
关于 JIT 和 AOT 性能特性之间的比较常常有很多混淆。JIT 能访问到准确的本地类型信息,以及应用运行期间的 execution profile,但它付出的代价是较慢的预热过程。AOT 可以推断和验证全局属性(代价是较长的编译时间),但没有应用如何实际执行的信息。换句话说,AOT 编译的代码实际没有预热过程,启动后几乎就能达到性能峰值。当前 Dart VM JIT 有最好的性能峰值,而 Dart VM AOT 有最短的启动时间。
无法 JIT 意味着:
- AOT snapshot 必须包含应用执行期间每个可能被调用的函数的可执行代码
- 这些可执行代码不能依赖任何在执行期间可能被违反的假设
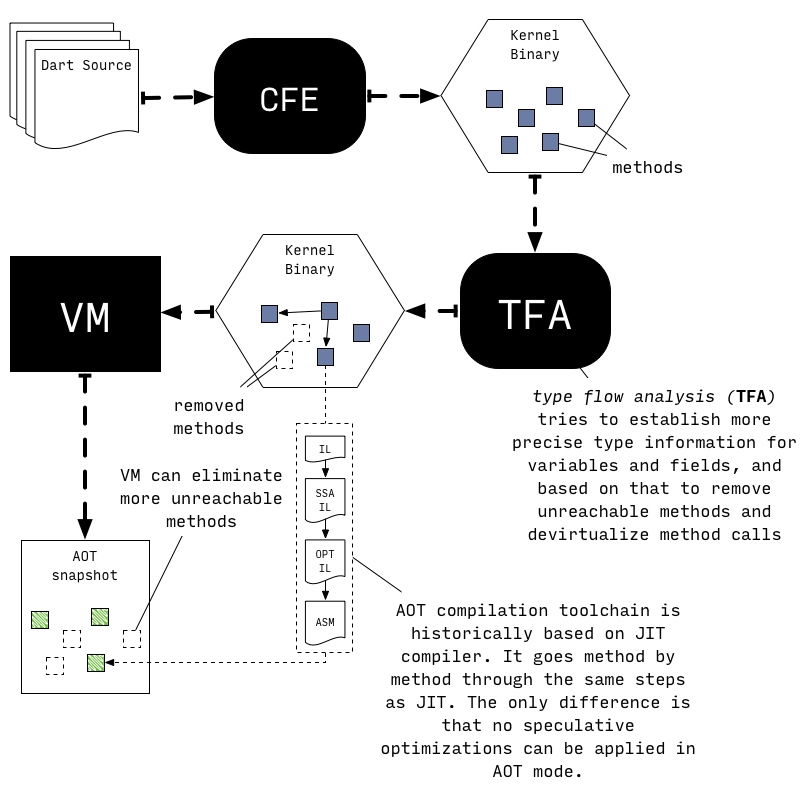
为了满足这些需求,AOT 编译时会进行全局静态分析(type flow analysis,TFA)以确定从一些已知的入口出发,应用的哪些部分是可达的;会分配哪些类的实例;以及程序的 type flow 是怎样的。所有这些分析都是保守的:即它们更看重正确性。这与 JIT 更看重高性能是截然不同的。JIT 总是可以在必要时”反优化”到 unoptimized code 来实现正确的行为。
所有潜在可达的函数被编译成 native code,不做任何推测优化(All potentially reachable functions are then compiled to native code without any speculative optimizations)。当然,仍然会使用 type flow 信息对代码进行处理(比如,取消虚调用 devirtualize calls)。
所以函数编译完成后生成 snapshot。生成的 snapshot 可以在 precompiled runtime,这是一个特别的 Dart VM,没有 JIT 组件及动态加载代码的能力。
源码清单:
- package:vm/transformations/type_flow/transformer.dart 是 type flow 分析及基于 TFA 转换的入口
- Precompiler::DoCompileAll 是 VM 中 AOT 编译循环(the AOT compilation loop in the VM)的入口
动手尝试!目前 Dart SDK 并不包含 AOT 编译流水线,那些依赖这个特性的项目(比如 Flutter)必须自行从 SDK 构建这个功能。pkg/vm/tool/precompiler2 脚本是个不错的参考,它演示了流水线是如何组织的,哪些二进制产物必须被构建。
1 | # Need to build normal dart executable and runtime for running AOT code. |
注意:如果想检查生成的 AOT 代码,类似 --print-flow-graph-optimized 或 --disassemble-optimized 这些参数也可以传给 precompiler2 脚本。
Runtime System
敬请期待 (译者注:原文还在完善中)
Object Model
敬请期待 (译者注:原文还在完善中)