Bitmap 之从出生到死亡
Bitmap 不像四大组件一样有明确定义的生命周期。但作为 Java 对象,Bitmap 仍然有一个从出生到死亡的过程,它是内存超级大户,所以了解内存在其生命周期中是如何被分配和销毁是必要的。本文试图理清创建和销毁 Bitmap 过程的主脉络,忽略一些细节,重点聚焦内存分配与回收。如有疏漏,欢迎批评指正。
Bitmap 占内存多是因为其像素数据(pixels)大。Bitmap 像素数据的存储在不同 Android 版本之间有所不同,具体来说:
- Android 2.3 (API Level 10) 以及之前 - 像素数据保存在 native heap
- Android 3.0 到 Android 7.1 (API Level 11-26) - 像素数据保存在 java heap
- Android 8.0 以及之后 - 像素数据保存在 native heap
这种变化导致不同 Android 版本间 Bitmap 相关的代码可能有较大差异。本文基于 Android 8.0 源码分析。
总览
先从整体上看一下 Bitmap。
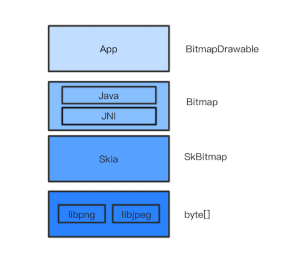
- 用户在手机屏幕上看到的是一张张图片
- App 中这些图片实际上是 BitmapDrawable
- BitmapDrawable 是对 Bitmap 的包装
- Bitmap 是对 SkBitmap 的包装。具体说来, Bitmap 的实现包括 Java 层和 JNI 层,JNI 层依赖 Skia。
- SkBitmap 本质上可简单理解为内存中的一个字节数组
所以说 Bitmap 其实是一个字节数组。创建 Bitmap 是在内存中分配一个字节数组,销毁 Bitmap 则是回收这个字节数组。
创建
创建 Bitmap 的方式很多,
- 可以通过 SDK 提供的 API 来创建 Bitmap
- 加载某些布局或资源时会创建 Bitmap
- Glide 等第三方图片库会创建 Bitmap
先说通过 API 创建 Bitmap。SDK 中创建 Bitmap 的 API 很多,分成三大类:
- 创建 Bitmap -
Bitmap.createBitmap()方法在内存中从无到有地创建 Bitmap - 拷贝 Bitmap -
Bitmap.copy()从已有的 Bitmap 拷贝出一个新的 Bitmap - 解码 - 从文件或字节数组等资源解码得到 Bitmap,这是最常见的创建方式
- BitmapFactory.decodeResource()
- ImageDecoder.decodeBitmap。ImageDecoder 是 Android 9.0 新加的类
假设 resId 对应的是一张图片。加载如下布局文件时会创建一个 Bitmap:
1 | <ImageView android:src="@drawable/resId"> |
代码中加载资源也会创建出一个 Bitmap:
1 | Drawable drawable = Resources.getDrawable(resId) |
实际项目中往往不是直接调用 API 来创建 Bitmap,而是使用 Glide 或 Picosso 等第三方图片库。这些库成熟稳定,接口易用性好,可以更轻松地在开发过程中处理 Bitmap 。
以 Glide 为例,只要一行代码可以很方便地从网络上加载一张图片。但另一方面,Glide 也让 Bitmap 的创建过程更加多样化和复杂化。
1 | Glide.with(this).load("http://goo.gl/gEgYUd").into(imageView); |
太多的创建 Bitmap 的方式,简直让人头大。但好在无论哪种创建方式,最终殊途同归。见下图:
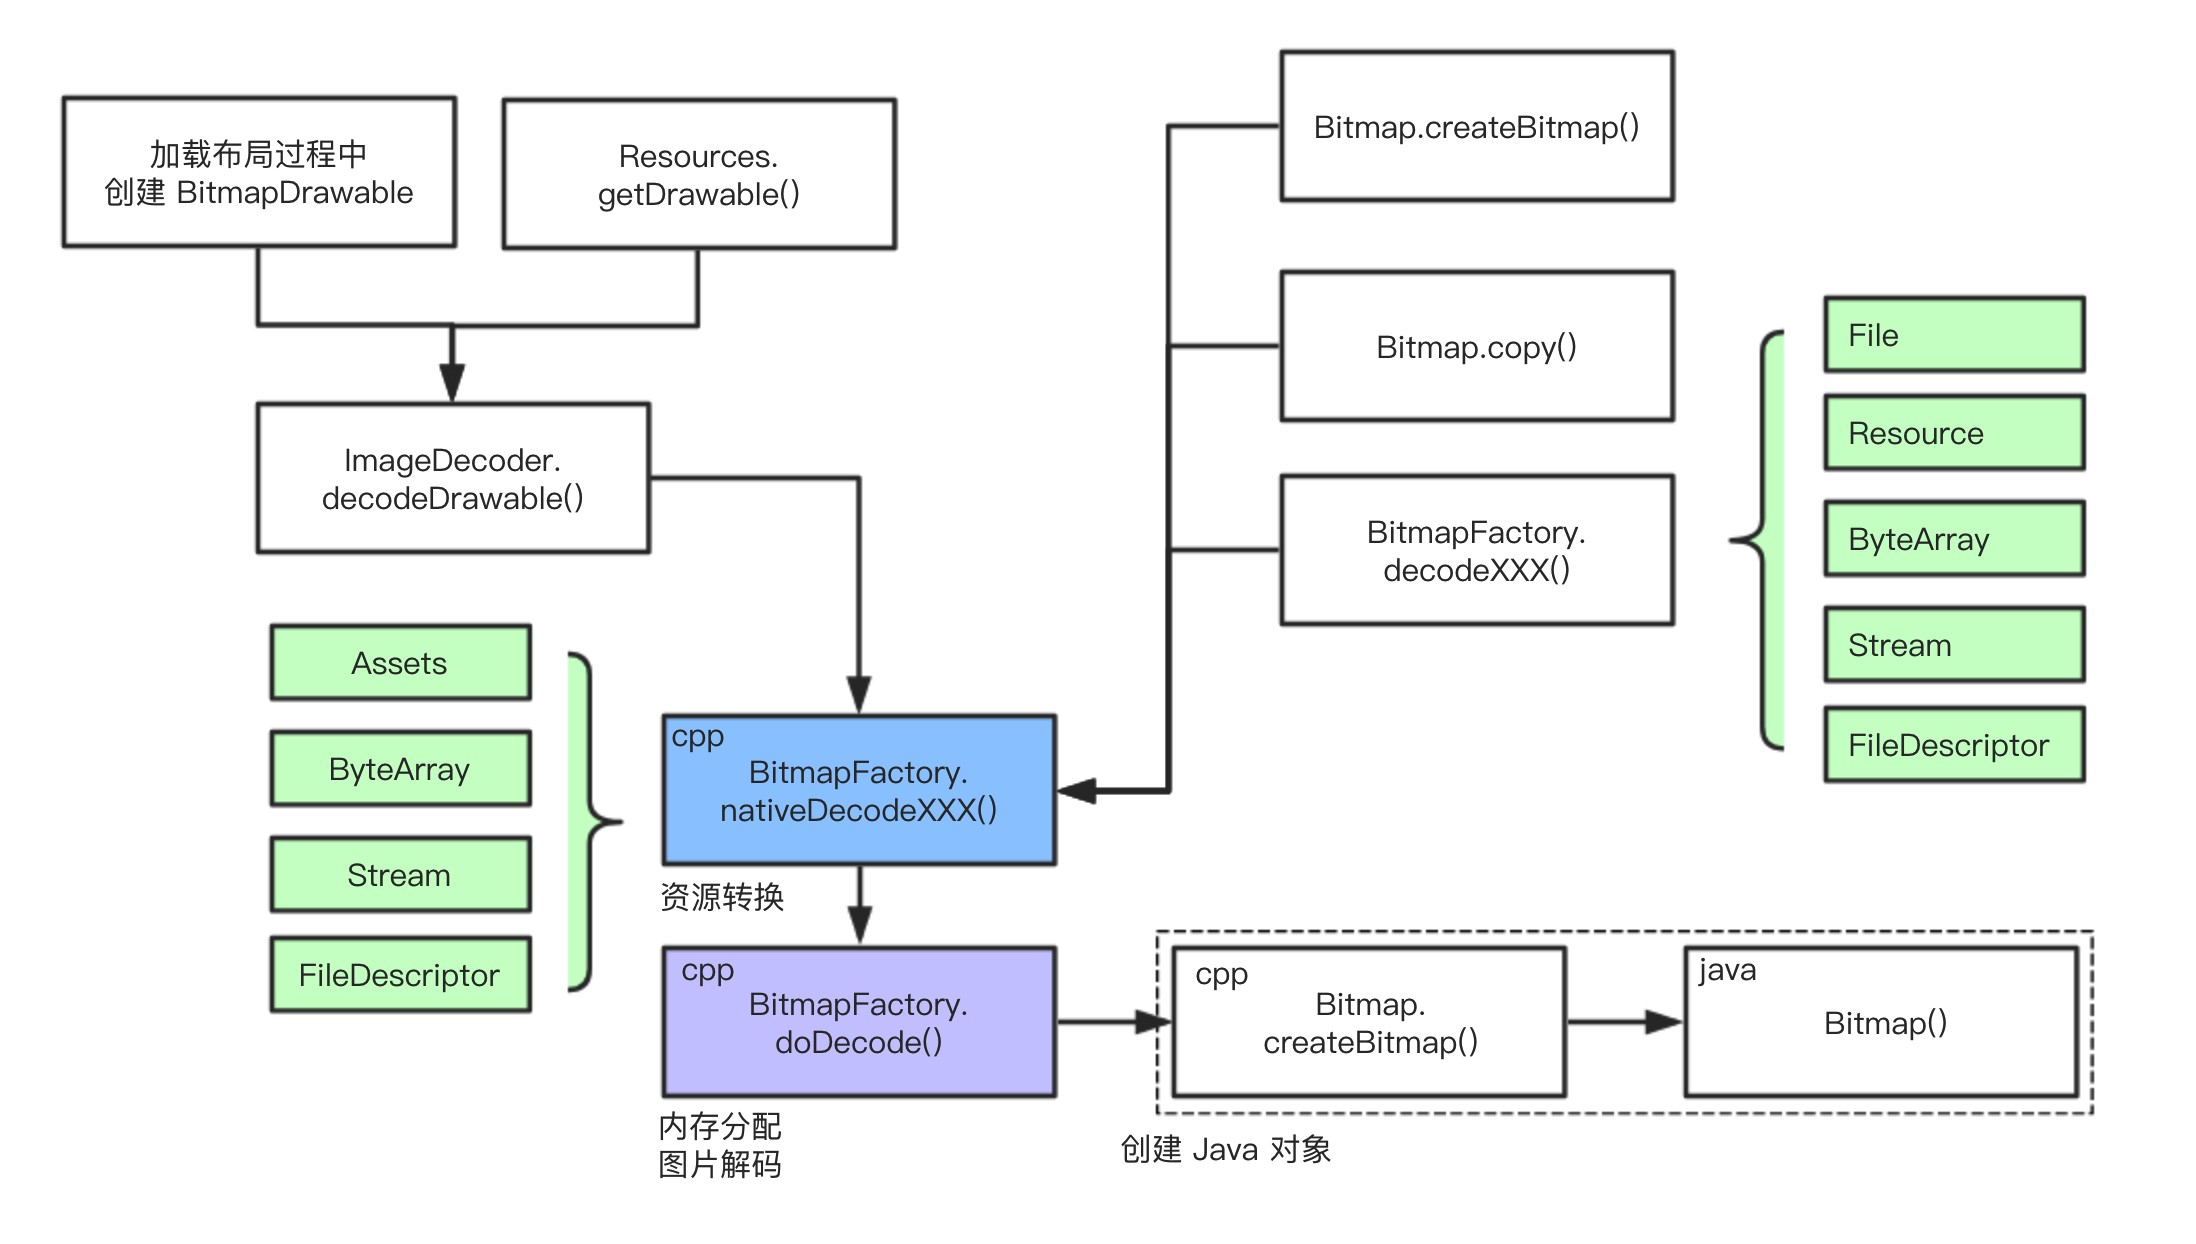
Java 层的创建 Bitmap 的所有 API 进入到 Native 层后,全都会走如下这四个步骤。
- 资源转换 - 这一步将 Java 层传来的不同类型的资源转换成解码器可识别的数据类型
- 内存分配 - 分配内存时会考虑是否复用 Bitmap、是否缩放 Bitmap 等因素
- 图片解码 - 实际的解码工作由第三方库完成,解码结果填在上一步分配的内存中。注,
Bitmap.createBitmap()和Bitmap.copy()创建的 Bitmap 不需要进行图片解码 - 创建对象 - 这一步将包含解码数据的内存块包装成 Java 层的
android.graphics.Bitmap对象,方便 App 使用
内存分配和图片解码由 BitmapFactory.doDecode() 函数完成。它是创建 Bitmap 的核心,主要负责内存分配和图片解码。其关键步骤包括:
- Update with options supplied by the client.
- Create the codec.
- Handle sampleSize. (跟 BitmapFactory.Options.inSampleSize 参数相关)
- Set the decode colorType.
- Handle scale. (跟 BitmapFactory.Options.inScaled 参数相关)
- Handle reuseBitmap (跟 BitmapFactory.Options.inBitmap 参数相关)
- Choose decodeAllocator
- Construct a color table
- AllocPixels
- Use SkAndroidCodec to perform the decode.
- Create the java bitmap
我们先简单说说资源转换,稍后详细讨论内存分配和图片解码(包括第7, 9, 10步)。
资源转换
解码前的第一项工作是资源转换。Java 层的待解码资源包括:
- File
- Resource
- ByteArray
- Stream
- FileDescriptor
第一步,在 JNI 层将待解码的资源重新划分成四种,包括:
- FileDescriptor
- Asset
- ByteArray
- DecodeAsset
第二步,BitmapFactory 提供四个方法对资源进行转换,
1 | nativeDecodeFileDescriptor() |
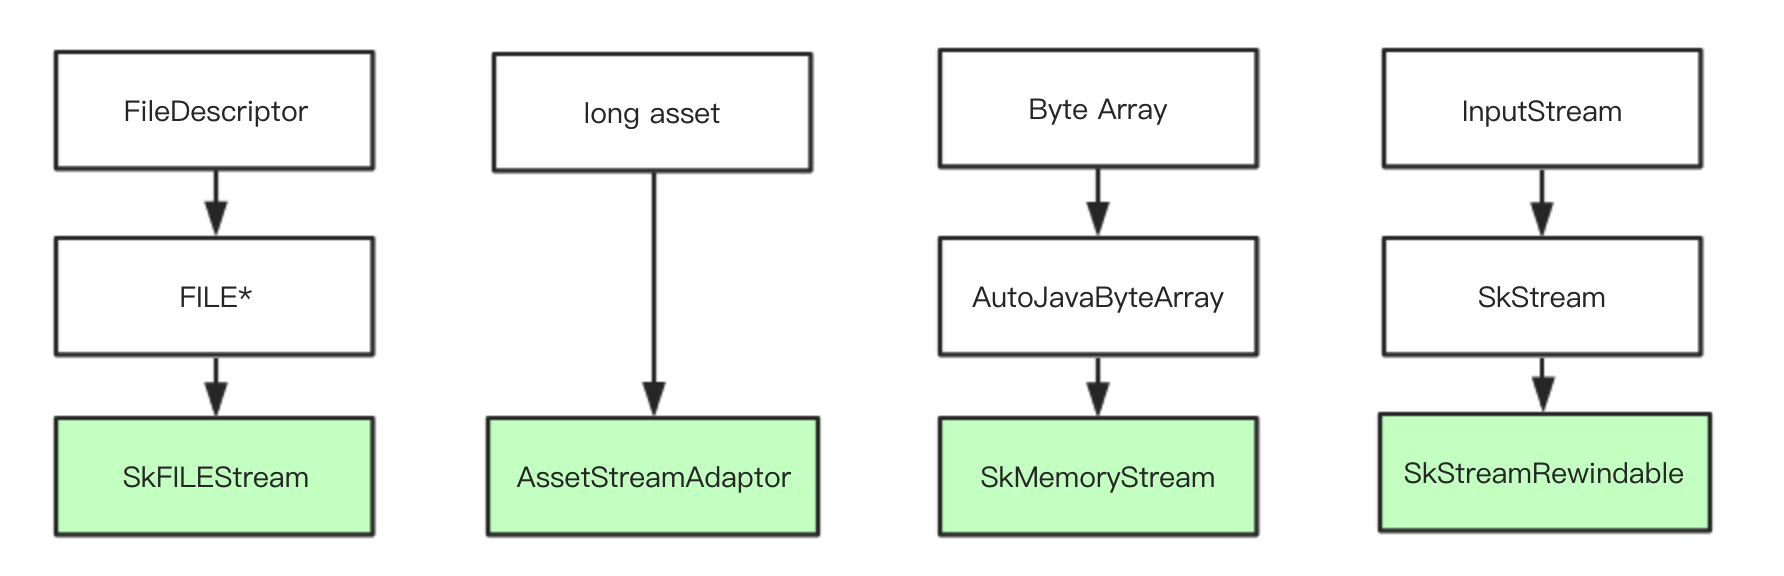
所有的资源都会转换成与 SkStreamRewindable 兼容的数据。
最后,BitmapFactory.doDecode() 统一解码处理 SkStreamRewindable。
内存分配
解码前的第二项工作是内存分配。
首先是选择 decodeAllocator (见上文提到的 BitmapFactory.doDecode() 的第7步)。有以下几种 Allocator 可供选择:
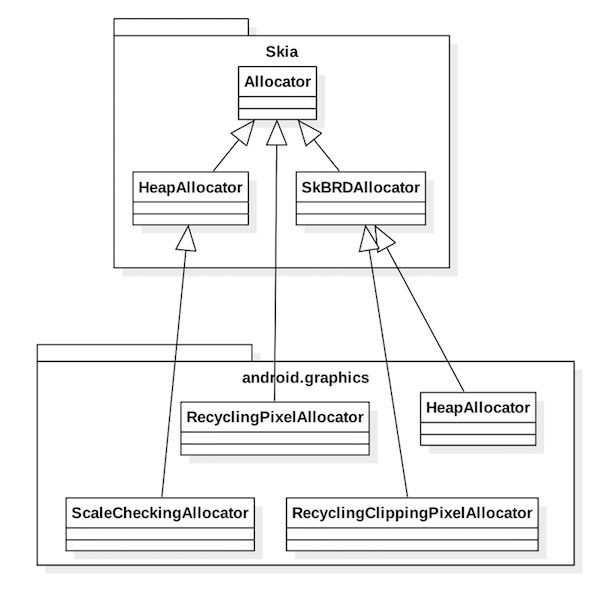
选择 Allocator 时考虑的因素包括:是否复用已有 Bitmap,是否会缩放 Bitmap,是否是 Hardware Bitmap。选择策略总结如下:
| 是否复用已有 Bitmap | 是否会缩放 Bitmap | 是否是 Hardware Bitmap | Allocator类型 |
|---|---|---|---|
| 是 | 是 | - | ScaleCheckingAllocator |
| 是 | 否 | - | RecyclingPixelAllocator |
| 否 | 是 | 是 | SkBitmap::HeapAllocator |
| - | - | - | HeapAllocator (缺省的Allocator) |
接下来,使用选定的 Allocator 分配内存。
1 | BitmapFactory.doDecode() -> |
代码如下:
1 | // BitmapFactory.cpp |
Allocator 的类型有四种,我们只看其中的两种。
先看 SkBitmap::HeapAllocator 作为 decodeAllocator 进行内存分配的流程。
- SkBitmap::tryAllocPixels
- SkBitmap::HeapAllocator::allocPixelRef
- SkMallocPixelRef::MakeAllocate
- sk_calloc_canfail
- sk_malloc_flags
对应的代码如下(可以看到最终会调用 malloc() 分配指定大小的内存):
1 |
|
再来看 HeapAllocator 作为 decodeAllocator 进行内存分配的流程。
对应的代码如下:
1 | // Graphics.cpp https://android.googlesource.com/platform/frameworks/base/+/refs/heads/oreo-release/core/jni/android/graphics/Graphics.cpp#616 |
对于 RecyclingPixelAllocator 和 ScaleCheckingAllocator 的情况,读者可以自行分析。
无论哪种 Allocator,最终要么调用 malloc() 分配内存,要么复用之前分配的内存。分配/复用完成后,由 SkBitmap 来持有这块内存,供下一步中图片解码用。
注:
- 准确来说,
SkBitmap::HeapAllocator分配内存由 SkBitmap 的 SkPixmap 持有,而不是 SkBitmap 持有。忽略这个细节 - 准确来说,
HeapAllocator分配的内存是由android::Bitmap.mStorage持有,而不是 SkBitmap 持有。但android::Bitmap与 SkBitmap 有某种关联,所以可以忽略这个细节
图片解码
在 Skia 中 SkCodec 代表解码器,解码器的类层次结构如下:

Skia 将实际的解码工作交由第三方库,不同图片格式有各自对应的解码器。比如 PNG 图片由 SkPngCodec 解码,而 SkPngCodec 是封装和调用 libpng 库。
前面提到 BitmapFactory.doDecode() 的第2步是创建解码器,第10步是调用该解码器进行解码。
- SkCodec::MakeFromStream() 根据图片格式选择一个合适的
SkCodec,比如为 PNG 图片选择SkPngCodec - SkAndroidCodec::MakeFromStream() 创建
SkAndroidCodec, 它是上一步创建的SkCodec的代理。SkAndroidCodec的具体类型跟图片格式有关。PNG,JPEG,GIF,BMP 等格式时其类型是SkSampledCodec,WEBP 格式时是SkAndroidCodecAdapter - 调用 SkAndroidCodec.getAndroidPixels() 解码
代码如下:
1 | static jobject doDecode() { |
以 PNG 图片为例来分析。 首先,对于 PNG 图片
- 以上代码中,
codec是SkSampledCodec SkSampledCodec使用的解码器是SkPngCodec(见SkAndroidCodec.fCodec字段)。
解码流程如下图:
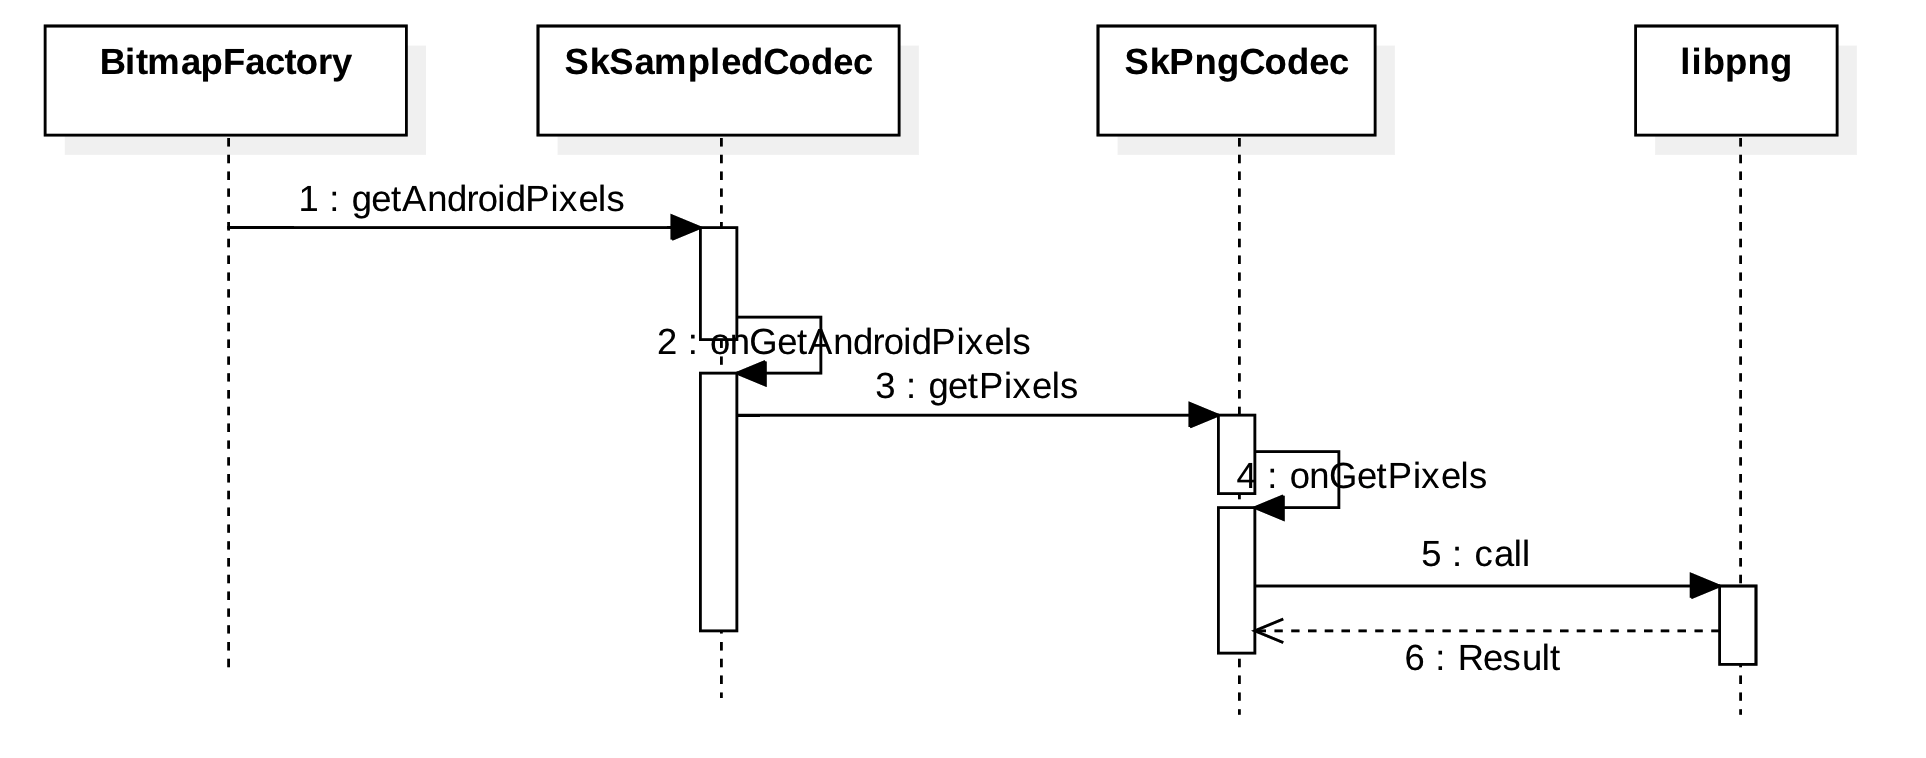
第一步是调用 codec->getAndroidPixels() 方法。注意第二个参数正是上一步分配的内存地址,即 SkBitmap 持有的内存。
接下来是一系列函数调用。注意传入的内存地址参数 dst 即可,其他细节忽略。
然后会执行到 SkPngCodec.onGetPixels() 方法。它使用 libpng 库解码 PNG 图片。
1 | SkCodec::Result SkPngCodec::onGetPixels(const SkImageInfo& dstInfo, void* dst, |
最终,解码结果保存在 dst 指针指向的内存,即 SkBitmap 持有的内存。
创建Java对象
解码完成后得到 Native 层的 SkBitmap 对象,最后一步工作是将其封装成 Java 层可以使用的 Bitmap 对象。
这一步的过程相对简单,分为三步:
1 | BitmapFactory.doDecode() -> |
对应的代码如下:
1 | // BitmapFactory.cpp |
1 | // Bitmap.java |
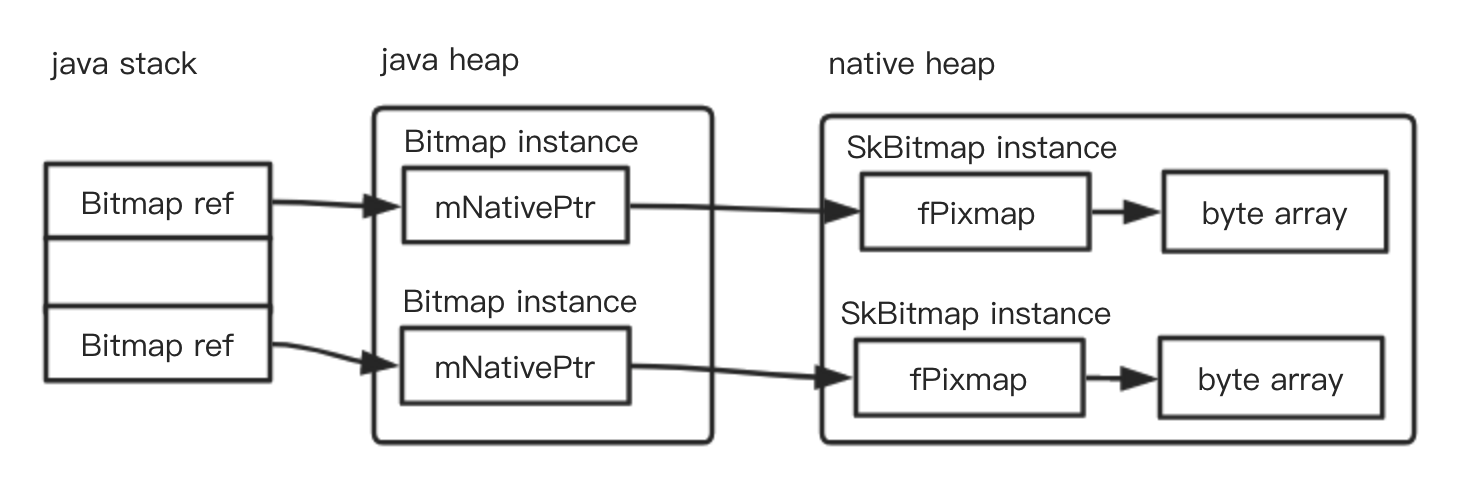
至此,Java 层的 Bitmap 对象创建完毕,它在内存中大致是这样的:
销毁
上一节重点是讲如何为 Bitmap 分配内存,这一节重点讲如何在 Bitmap 销毁时回收内存。
Java 层的 Bitmap 对象有点特别,特别之处在于其像素数据保存在 native heap。我们知道, native heap 并不被 JVM 管理,那如何保证 Bitmap 对象本身被 GC 后 native heap 中的内存也能正确回收呢?
recycle()
首先想到的是在代码主动调用 Bitmap.recycle() 方法来释放 native 内存。
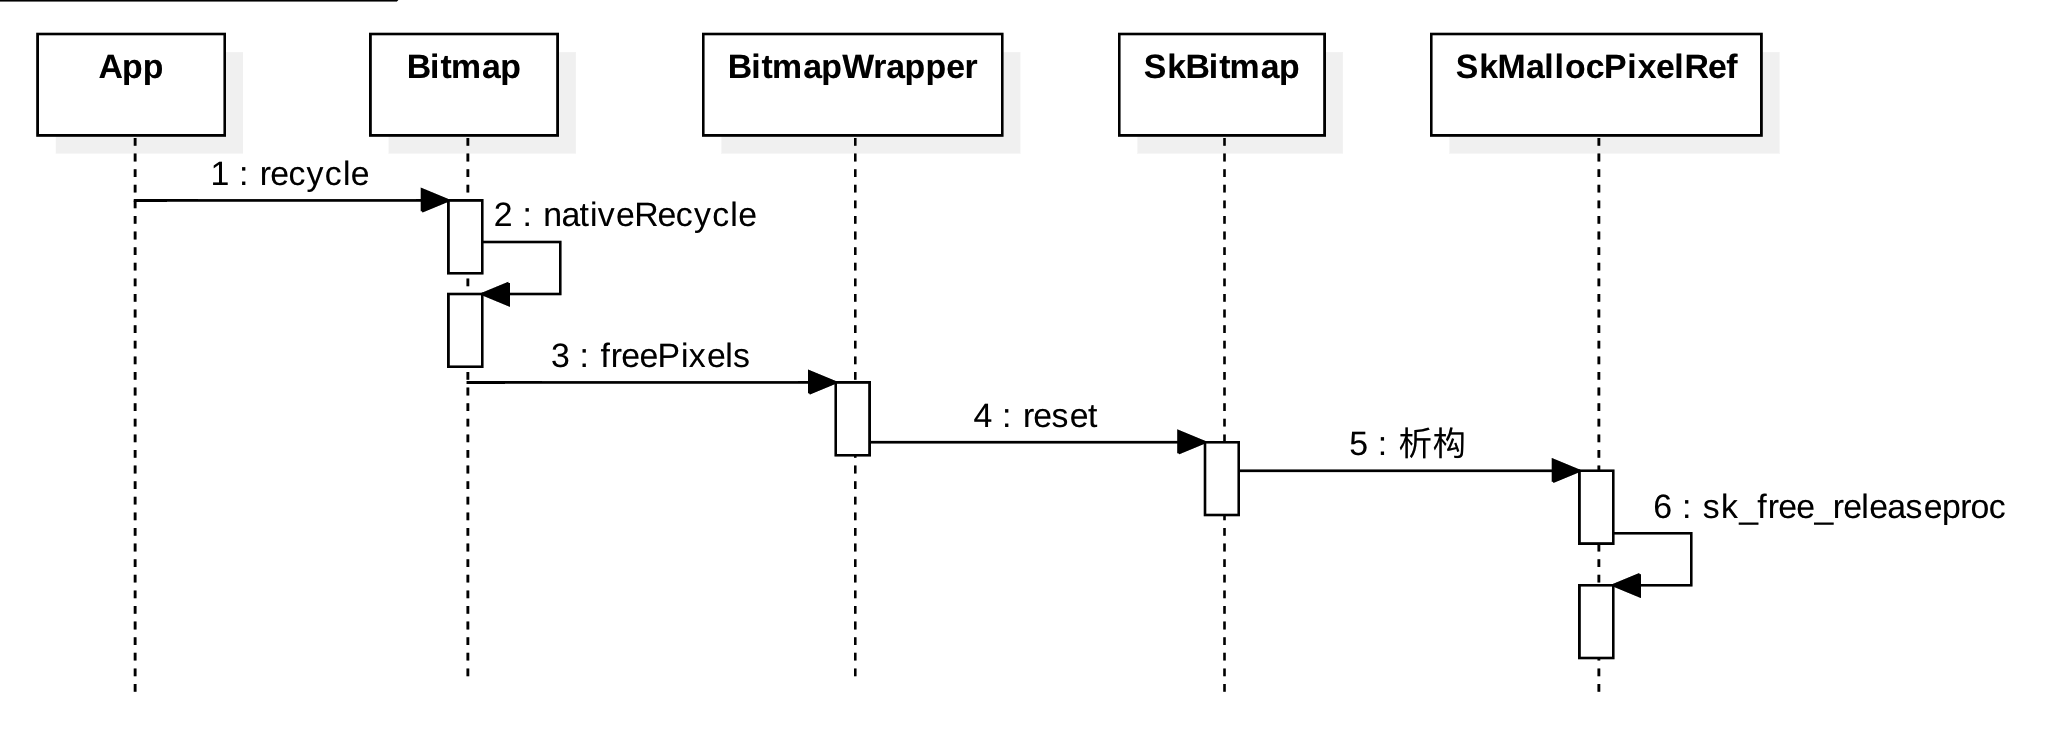
Bitmap.recycle() 方法流程如下:
来看具体代码。
1 | /** |
1 | // Bitmap.cpp https://android.googlesource.com/platform/frameworks/base/+/refs/heads/oreo-release/core/jni/android/graphics/Bitmap.cpp#872 |
1 | /** Resets to its initial state; all fields are set to zero, as if SkBitmap had |
- 首先,App 主动调用
Bitmap.recycle()方法 - 接下来,
Bitmap.recycle()调用对应的 native 方法Bitmap_recycle() - 然后会进入到
BitmapWrapper.freePixels()方法 - 最后,SkBitmap.reset() 将
fPixelRef置空。注:之前分配内存过程中可以看到fPixelRef是如何被赋值的
fPixelRef 原本指向一个 SkMallocPixelRef 对象。将 fPixelRef 置空后,该对象引用数变成0时,~SkMallocPixelRef() 析构方法被调用,并触发 sk_free_releaseproc() 方法执行,回收内存。
提示:
- 注意这里的
SkMallocPixelRef::fReleaseProc成员变量,它是保存的是方法地址,这个方法将被用于回收内存 - 在之前分配内存时,
sk_free_releaseproc()方法地址作为SkMallocPixelRef()构造方法的参数 (参数类型SkMallocPixelRef::ReleaseProc) 被传进来并保存在SkMallocPixelRef::fReleaseProc
1 | // SkMemory_malloc.cpp https://github.com/google/skia/blob/master/src/ports/SkMemory_malloc.cpp#L66 |
自动释放
实际上现在的 Android 应用中多数场景代码不主动调用 recycle(), native 内存也能正确回收。这是为何?秘密在于 NativeAllocationRegistry。NativeAllocationRegistry 将 native 内存跟 Java 对象关联起来,以实现内存自动管理。
NativeAllocationRegistry 用于将 native 内存跟 Java 对象关联,并将它们注册到 Java 运行时。注册 Java 对象关联的 native 内存有几个好处:
- Java 运行时在 GC 调度时可考虑 native 内存状态
- Java 运行时在 Java 对象变得不可达时可以使用用户提供的函数来自动清理 native 内存
来看代码。
1 | Bitmap(long nativeBitmap, int width, int height, int density, |
注意到 Bitmap 构造方法有如下操作:
- 向
NativeAllocationRegistry提供nativeGetNativeFinalizer()方法地址 - 将当前 Java 对象本身注册到
NativeAllocationRegistry - 将当前 Java 对象关联的 native 内存地址注册到
NativeAllocationRegistry
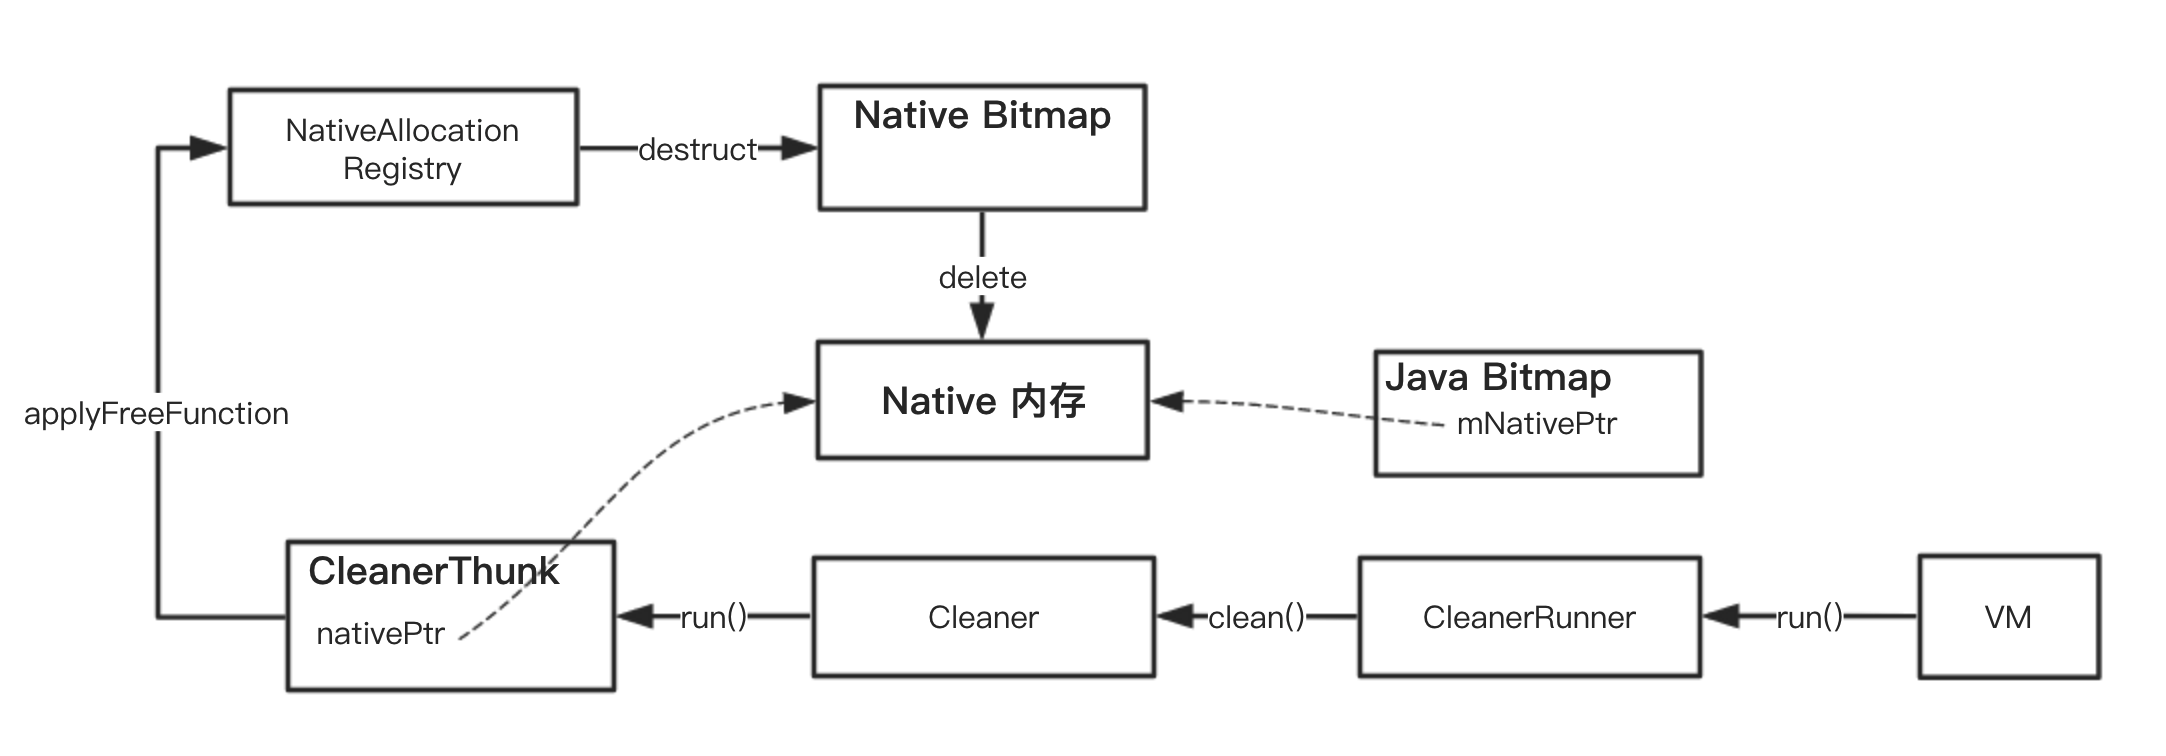
当 Java 层 Bitmap 对象不可达后关联的 native 内存会由 nativeGetNativeFinalizer() 指定的方法来回收,流程如下:
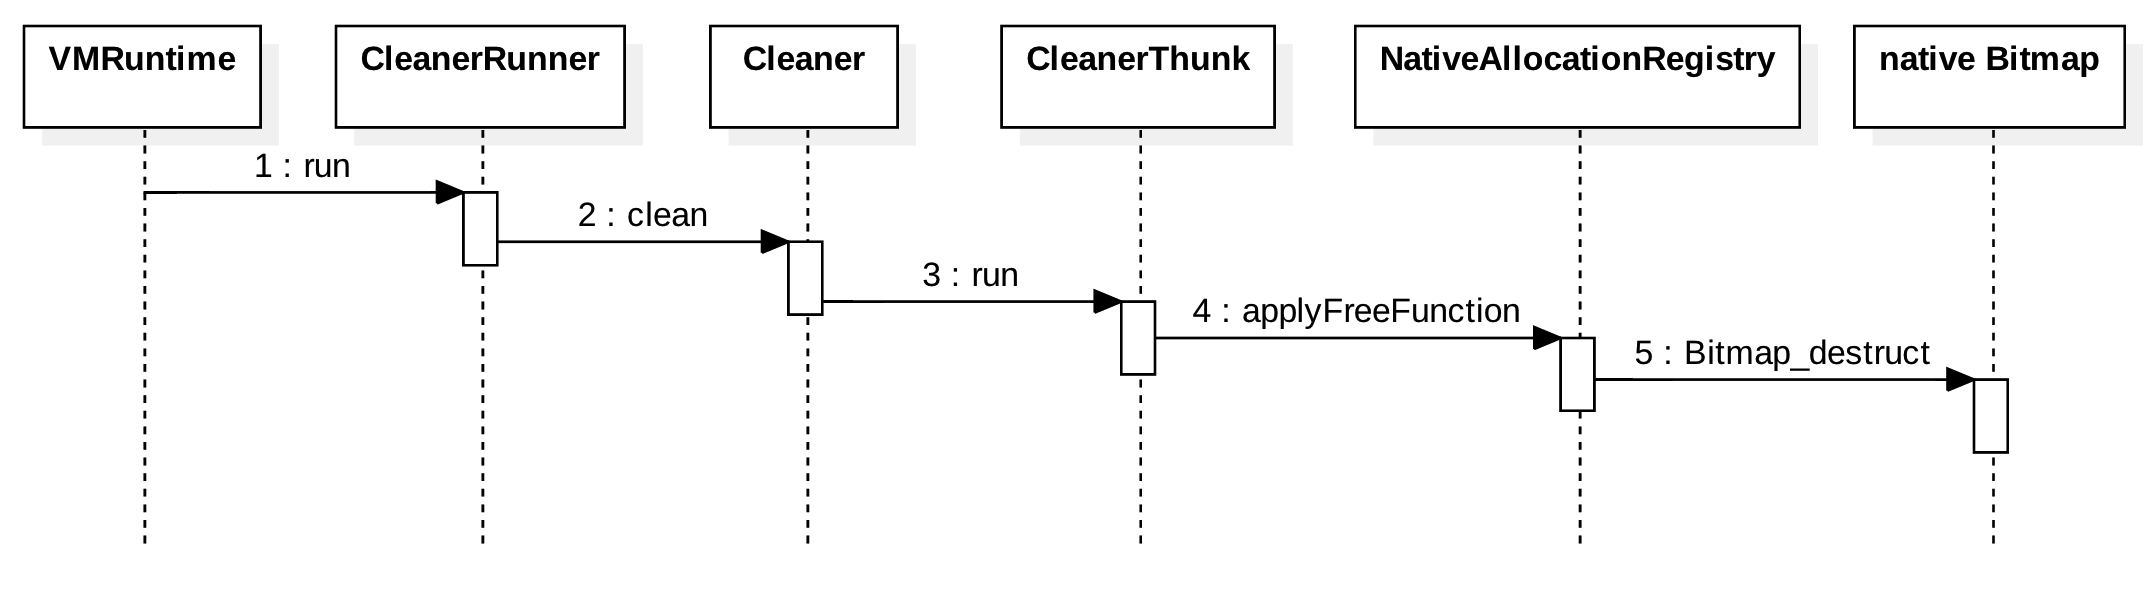
来看 NativeAllocationRegistry 的代码:
1 | public class NativeAllocationRegistry { |
对 Bitmap 而言,Bitmap_destruct() 方法被指定用来回收 native 内存。这个方法超级简单,相信你一眼能看明白。
1 | static void Bitmap_destruct(BitmapWrapper* bitmap) { |
如果想了解更多细节,可以看 Cleaner 源码。