Puppeteer 问题小记

记录使用 Puppeteer 时遇到的两个小问题,以备忘。

安装 puppeteer 失败

1
2
3
4
5
6
7
8
9
10
11
12
13
14
15
16
17
18
19
20
21
22
23
24
25
26
$ npm i puppeteer
> puppeteer@14.1.1 install /home/gitlab-runner/builds/deaaa930/0/project-abc/node_modules/puppeteer
> node install.js
ERROR: Failed to set up Chromium r991974! Set "PUPPETEER_SKIP_DOWNLOAD" env variable to skip download.
Error: connect ETIMEDOUT 172.217.31.16:443
at TCPConnectWrap.afterConnect [as oncomplete] (net.js:1144:16) {
errno: 'ETIMEDOUT',
code: 'ETIMEDOUT',
syscall: 'connect',
address: '172.217.31.16',
port: 443
}

npm WARN notsup Unsupported engine for puppeteer@14.1.1: wanted: {"node":">=14.1.0"} (current: {"node":"12.22.7","npm":"6.14.15"})
npm WARN notsup Not compatible with your version of node/npm: puppeteer@14.1.1
npm WARN enoent ENOENT: no such file or directory, open '/home/gitlab-runner/builds/deaaa930/0/project-abc/package.json'
npm WARN project-abc No description
npm WARN project-abc No repository field.
npm WARN project-abc No README data
npm WARN project-abc No license field.
npm ERR! code ELIFECYCLE
npm ERR! errno 1
npm ERR! puppeteer@14.1.1 install: `node install.js`
npm ERR! Exit status 1
npm ERR!
npm ERR! Failed at the puppeteer@14.1.1 install script.

看错误日志是在执行 npm i puppeteer 时出现失败,猜测是当时出现网络故障。

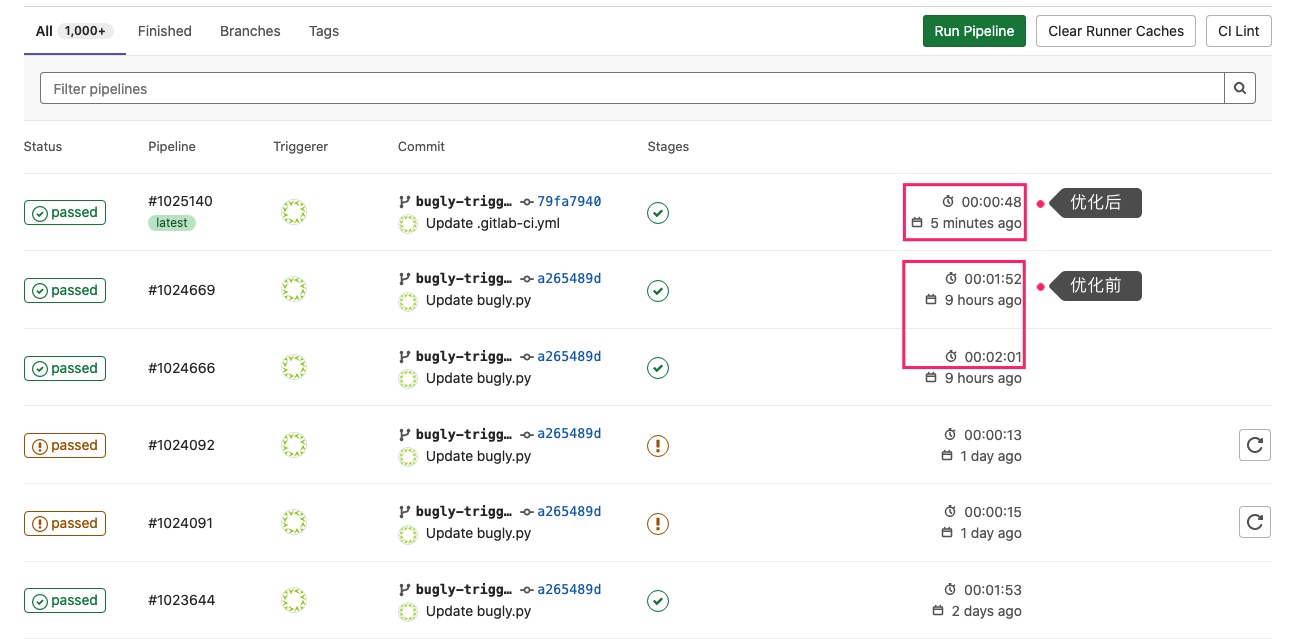
解决办法:实际上已经在 gitlab runner 所在的机器上全局安装过 puppeteer@14.1.1,且设置了 gitlab CI 缓存,所以没必要每次构建时都重新安装。.gitlab-ci.yml 优化如下。

1
2
3
4
5
6
7
8
9
10
11
12
13
14
15
16
17
18
19
20
21
22
23
stages:
- build
- test
- deploy

before_script:
#- whoami
- npm list puppeteer
- npm list puppeteer || npm install puppeteer@14.1.1

bugly:
stage: build
cache:
key: ${CI_BUILD_REF_NAME}
paths:
- node_modules/
script:
./bugly.sh "${IS_PRD}"
tags:
- android
only:
- bugly-trigger
allow_failure: true

优化后的另一个意想不到的好处是 gitlab CI速度加快了 (省去了安装 重新安装 puppeteer 的过程)

puppeteer 脚本执行失败

1
2
3
4
5
6
7
8
9
$ ./bugly.sh "${IS_PRD}"
(node:4711) UnhandledPromiseRejectionWarning: TypeError: Cannot read property 'waitForSelector' of undefined
at /home/gitlab-runner/builds/deaaa930/0/project-abc/pp.js:33:17
at processTicksAndRejections (internal/process/task_queues.js:97:5)
(node:4711) UnhandledPromiseRejectionWarning: Unhandled promise rejection.
This error originated either by throwing inside of an async function without a catch block, or by rejecting a promise which was not handled with .catch(). To terminate the node process on unhandled promise rejection, use the CLI flag `--unhandled-rejections=strict` (see https://nodejs.org/api/cli.html#cli_unhandled_rejections_mode). (rejection id: 1)
(node:4711) [DEP0018] DeprecationWarning: Unhandled promise rejections are deprecated. In the future, promise rejections that are not handled will terminate the Node.js process with a non-zero exit code.
Session terminated, killing shell... ...killed.
ERROR: Job failed: execution took longer than 1h0m0s seconds

错误原因:脚本中找不到指定元素后出错了,但是没有进行异常处理。正常情况下会执行 await browser.close() 及时关闭浏览器,异常时不会关闭浏览器而是无限等待,直到到达 gitlab CI的超时时间(60分钟)后才被外部杀死。

解决办法:增加异常处理和重试。

1
2
3
4
5
6
7
8
9
10
11
12
13
14
15
16
17
18
19
20
21
22
23
24
25
26
27
28
29
30
// 无异常处理
//(async () => {
// const browser = await puppeteer.launch({});

// // page: 用于模拟登录流程
// const page = (await browser.pages())[0];

// // 原脚本

// console.log(c);
// await browser.close();
//})();

// 有异常处理
(async () => {
const browser = await puppeteer.launch({});

try {
// page: 用于模拟登录流程
const page = (await browser.pages())[0];

// 原脚本

console.log(c);
} catch (error) {
console.log(error);
} finally {
await browser.close();
}
})();

此外,还在增加异常处理的基础上补充了重试机制。重试代码如下:

1
2
3
4
5
6
7
8
9
10
async function retry(promiseFactory, retryCount) {
try {
return await promiseFactory();
} catch (error) {
if (retryCount <= 0) {
throw error;
}
return await retry(promiseFactory, retryCount - 1);
}
}

参考自这里

自动登录

两个办法。一是直接使用 用户数据。注意这里的 userDataDir 参数,它指定了当前浏览器的数据目录。User Data Directory

1
2
3
4
5
6
7
8
9
const browser = await puppeteer.launch({
headless: true,
userDataDir: './puppeteer_data',
ignoreHTTPSErrors: true,
defaultViewport: false,
devtools: true,
// args: ['--disable-features=site-per-process', '--no-sandbox', '--disable-setuid-sandbox', '--disable-infobars']
args: ['--disable-features=site-per-process', '--no-sandbox'],
});

另一个思路是复用cookie。步骤如下:

  1. Chrome 安装 EditThisCookie 插件。EditThisCookie支持从Chrome中导出cookie。
  2. Chrome 打开任一飞书文档并确保当前已登录
  3. 使用 EditThisCookie 导出登录态并保存到文件中
  4. node crash_token.js 运行 puppeteer 脚本

w300

1
2
3
4
5
6
7
8
9
10
11
12
13
14
15
16
17
18
// hades_token.json, 飞书登录态
[
{
"domain": ".feishu.cn",
"expirationDate": 1666007863,
"hostOnly": false,
"httpOnly": false,
"name": "__tea__ug__uid",
"path": "/",
"sameSite": "unspecified",
"secure": false,
"session": false,
"storeId": "0",
"value": "7105953789148546601",
"id": 1
},
...
]

导出的cookie是一个json字符串。可以直接使用 await page.setCookie(...cookies) 将该json串设置给 puppeteer。

1
2
3
4
5
6
7
8
9
10
11
12
13
14
[{
"domain": ".feishu.cn",
"expirationDate": 1662259808.850663,
"hostOnly": false,
"httpOnly": false,
"name": "__tea__ug__uid",
"path": "/",
"sameSite": "unspecified",
"secure": false,
"session": false,
"storeId": "0",
"value": "7105953789148546601",
"id": 1
}]
1
2
3
4
5
6
7
8
9
10
11
12
13
14
15
16
17
const browser = await puppeteer.launch({
headless: false,
// userDataDir: './puppeteer_data',
ignoreHTTPSErrors: true,
defaultViewport: false,
devtools: true,
// args: ['--disable-features=site-per-process', '--no-sandbox', '--disable-setuid-sandbox', '--disable-infobars']
args: ['--disable-features=site-per-process', '--no-sandbox'],
});
// page: 用于模拟登录流程
const page = (await browser.pages())[0];

await page.goto('http://femap-ci.huolala.work/#/monitor/index', { waitUntil: "networkidle2" });

const cookies = fs.readFileSync('crash_toke.json', 'utf8')
const deserializedCookies = JSON.parse(cookies)
await page.setCookie(...deserializedCookies)

Running a second Puppeteer script using the same session cookies: Chip sandbox 提到了 userDataDirpage.setCookie 的区别:

前者使用了相同的用户数据来启动下一次测试。但实际上并不需要完全相同的用户数据,通常只需要使用相同的 cookie 来启动下一次测试即可。

参考