关于 Tinker 用于 Flutter 热更新的思考
最近一篇文章提到使用 Tinker 替换 so 来实现 Android 平台上 Flutter 热更新。为什么 Tinker 可以更新/替换 so,它是如何实现换的?这个方案用于 Flutter 可能会存在哪些限制,原因是什么?一起来研究下吧。篇幅较长,水平有限,如有疏漏欢迎指正。
[TOC]
本文围绕 Tinker so 替换技术用于 Flutter 更新来讨论以下几个问题:
- Tinker 如何实现 so 更新/替换?
System.load()的执行流程是怎样的?- Flutter 大致的编译流程是怎样的?
- Flutter 编译产物是什么,有什么变更?
- so 替换如何应用于 Flutter 热更新?
- Flutter 及其编译产物的变更对上述方案有哪些潜在的影响?
前言
Tinker 是 Android 平台上一个流行的热更新框架,官网介绍如下:
Tinker is a hot-fix solution library for Android, it supports dex, library and resources update without reinstalling apk.
Tinker 更新 dex 的原理如下,

从介绍及原理图可以看出 Tinker 的主打功能是通过差分包更新 dex 来实现热更新,介绍中虽然简短地提到支持 library 热修复,但原理图中并没有给出相关内容。
Tinker 与其他主流热修复框架功能特性对比如下,

(图片来自 Tinker wiki)
只有 Tinker 支持 so 替换,是不是非常特别?我好奇它是如何实现的。
Tinker 如何更新 so 库
这是 Tinker API 概览:
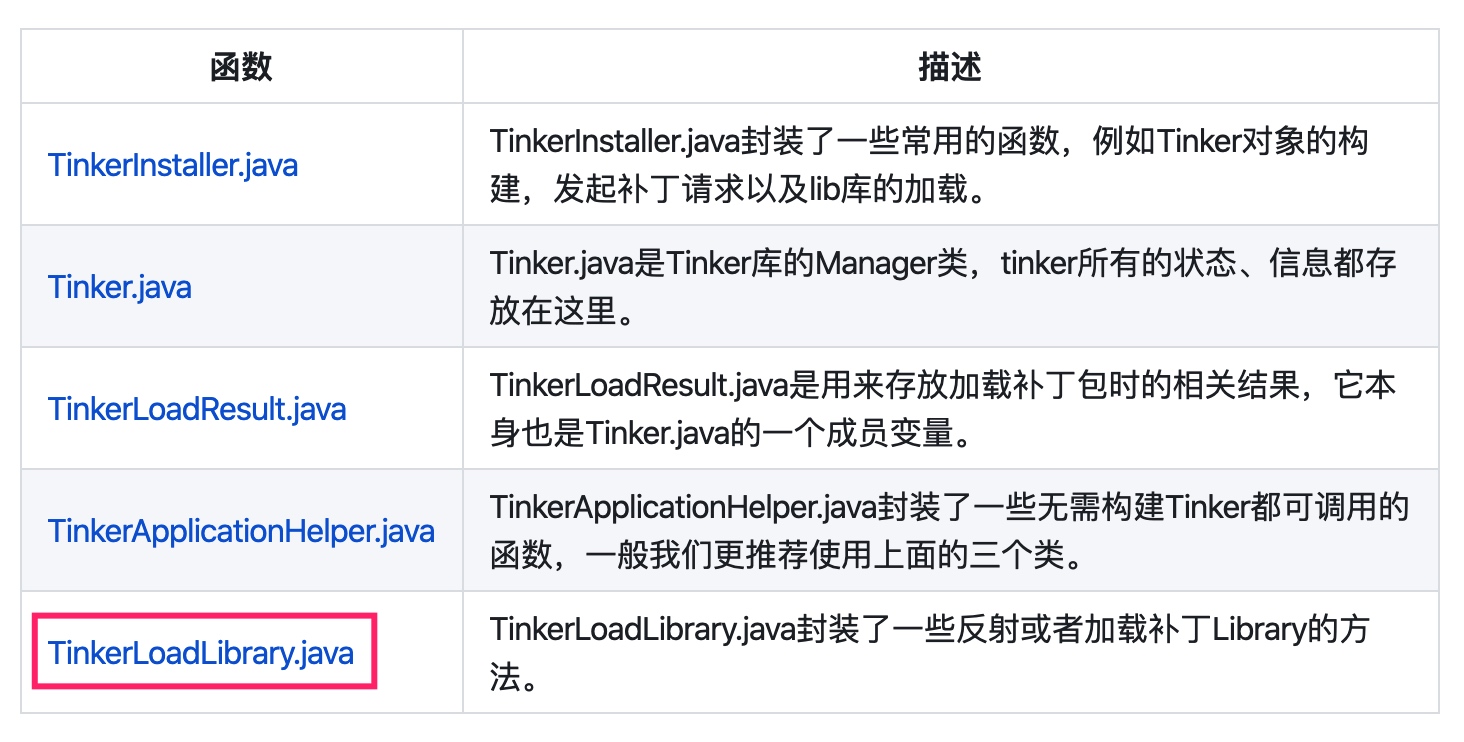
TinkerLoadLibrary 负责加载更新/替换后的 so,大致过程如下:
实际上 Tinker 会根据一些条件来选择不同的加载过程,限于篇幅这里我们只讨论左边这种情况。涉及到的主要代码是:
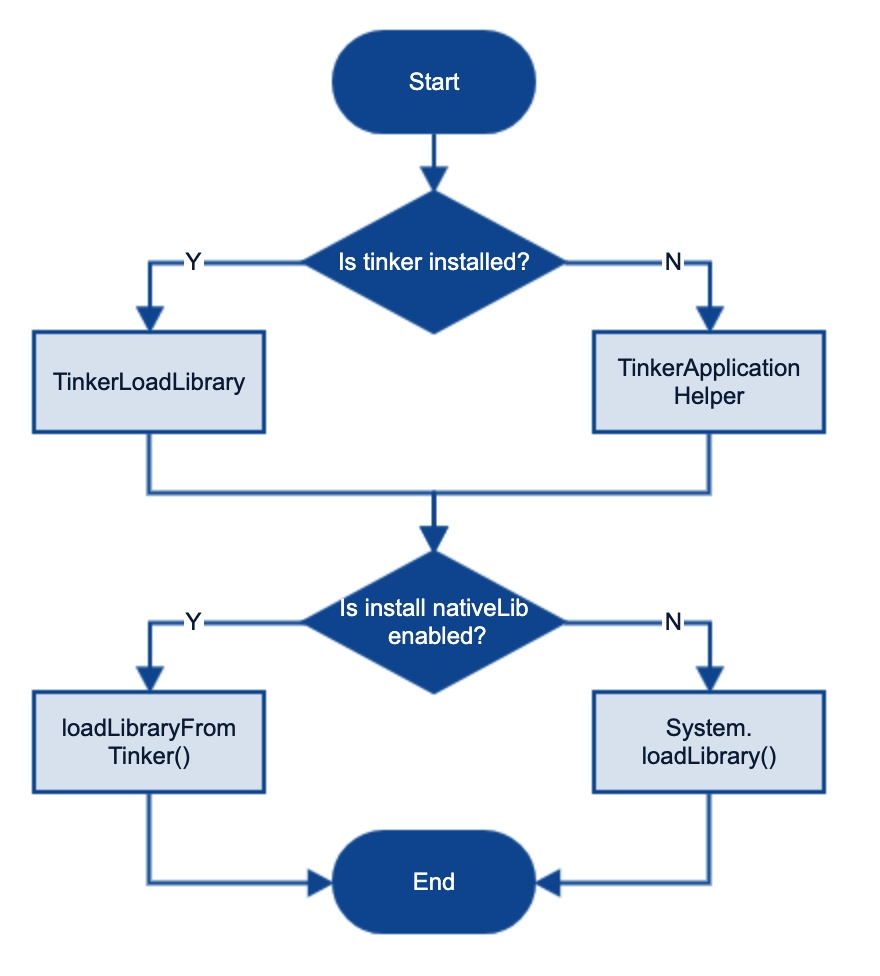
TinkerLoadLibrary.loadLibraryFromTinker(Context context, String relativePath, String libName) 的流程如下:
第一步是条件判断,检查是否支持加载 so、是否已构建(忽略, 我们不关注)Tinker、tinkerLoadResult是否存在,任一条件失败就直接结束- 第二步是遍历
tinkerLoadResult.libs,从中找到跟relativePath匹配的那一项并构建出patchLibraryPath - 第三步,通过 MD5 校验则调用 System.load() 加载 so 文件(由
patchLibraryPath指定),否则结束
单看这个流程的话,我们很快就能得出结论:Tinker 更新/替换 so,本质上不过是对 System.load() 的包装。
所以剩下的问题是梳理这里的 tinkerLoadResult.libs 到底指向了哪个文件?那个文件是如何来的?
继续分析之前先了解 Tinker 的几个背景知识:
- 第一,Tinker 合并差分包后生成新的 so 保存在相应目录下。目录名类似于
tinker/patch-641e634c/lib。
- 第二,使用 Tinker 库的一种方式是继承 DefaultApplicationLike,而它本身继承自 ApplicationLike。官方示例 的演示了
DefaultApplicationLike的用法,
1 | import com.tencent.tinker.anno.DefaultLifeCycle; |
- 第三,Tinker 的
@DefaultLifeCycle注解器(源码见 AnnotationProcessor)从SampleApplicationLike生成如下形式的 Application。具体用法可以参考官方示例
1 | /** |
简单总结一下:
@DefaultLifeCycle注解器从SampleApplicationLike生成SampleApplication- 生成的
SampleApplication继承自TinkerApplication SampleApplicationLike是SampleApplication的代理 (理解这个关系需要留意模板文件中的%APPLICATION_LIFE_CYCLE%以及 TinkerApplication 构造方法第二个参数)
有了这些背景知识,再回头看 tinkerLoadResult.libs。
第一步,应用启动时调用 TinkerApplication.loadTinker(),这个方法反射调用 TinkerLoader.tryLoad()。代码如下:
1 | public abstract class TinkerApplication extends Application { |
第二步,TinkerLoader.tryLoad() 最终调用 TinkerSoLoader 来加载 so 文件。代码如下:
1 | public class TinkerLoader extends AbstractTinkerLoader { |
第三步,TinkerSoLoader.checkComplete() 生成一个 HashMap 对象用于保存 so 文件相关的信息。而 HashMap 本身又保存在 Intent 中,字段名为 intent_patch_libs_path。代码如下:
1 | public class TinkerSoLoader { |
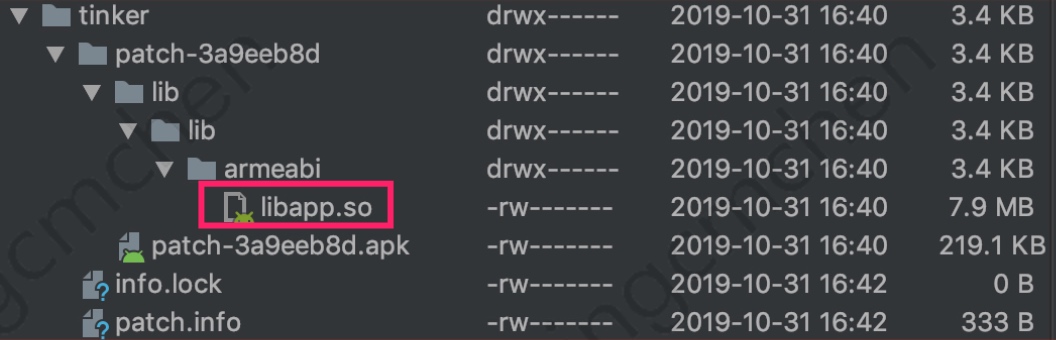
以这里的 so 文件为例,
HashMap 中包含如下数据:
- key -
tinker/patch-3a9eeb8d/lib/lib/armeabi/libapp.so - value - 该 so 文件的 MD5
注意,第三步中用于保存 HashMap 的 Intent 即第一步中的 TinkerApplication.tinkerResultIntent。
第四步,这一步涉及到的内容较多,是第三步和第五步之间的衔接,整理如下供参考。
两个关键点:
TinkerApplication.createInlineFence()反射方式创建TinkerApplicationInlineFenceTinkerApplicationInlineFence.createDelegate()反射方式创建ApplicationLike(ApplicationLike是TinkerApplication的代理)
主要流程:
1 | TinkerApplication.attachBaseContext() |
从这个流程可以看出 TinkerApplication 和 ApplicationLike 之间的关联。
再来结合 demo 来看 ApplicationLike.onBaseContextAttached() 这个回调,观察 ApplicationLike 是如何跟 TinkerInstaller 关联起来的。
1 |
|
第五步,调用 TinkerInstaller.install() 方法,一系列调用后将生成 TinkerLoadResult 对象。代码如下:
1 | public class TinkerInstaller { |
从以上代码可以看到,TinkerLoadResult.libs 来自于 ApplicationLike.getTinkerResultIntent() 返回的 Intent 中保存 HashMap 对象,其字段名为 intent_patch_libs_path。
前面提到过 ApplicationLike 是 TinkerApplication 的代理。ApplicationLike.getTinkerResultIntent() 返回的 Intent 其实就是 TinkerApplication.tinkerResultIntent,具体可参考 tinker/TinkerApplicationInlineFence.java。
TinkerLoadResult 代表加载结果,其 libs 字段保存了 so 文件地址。如果以 TinkerLoadResult 作为关注点,整个过程总结如下:
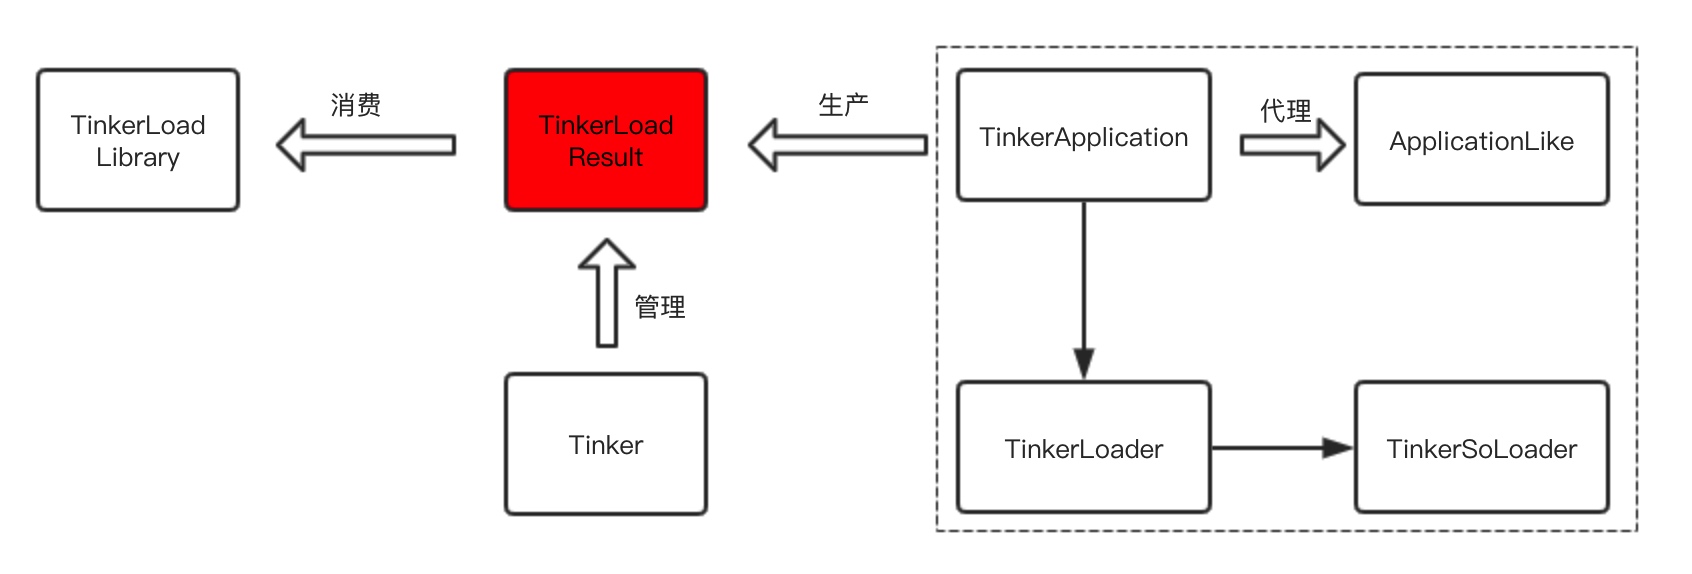
TinkerApplication及相关类是生产者,负责生产TinkerLoadResultTinker是管理者,负责管理TinkerLoadResultTnikerLoadLibrary是消费者,负责消费TinkerLoadResult
可见,无论这个过程多复杂,Tinker 最终仍然是调用 System.load() 加载 so 库。
System.load() 简介
前面提到 Tinker 更新/替换 so 库其实不过是对 System.load() 方法的包装。Flutter 引擎初始化 时也调用了 System.load() 方法。所以我们有必要了解这个方法。
考虑到已经有很多优秀的文章很好地总结了相关知识,我这里直接搬一些上来。
loadLibrary动态库加载过程分析 提到加载动态库的调用栈如下:
1 | System.loadLibrary() |
(注:无论 System.loadLibrary() 还是 System.load() 最后都会调用到 LoadNativeLibrary() 方法,所以这里对二者未加区分)
调用栈中最主要代码是:
LoadNativeLibrary() 方法执行如下几个操作:
- 通过
dlopen()打开动态共享库; - 通过
dlsym获取JNI_OnLoad符号所对应的方法; - 调用该加载库中的
JNI_OnLoad()方法
dlopen() 和 dlsym() 是 Linux 系统为动态链接器提供的接口,允许应用程序在运行时加载和链接动态库。这个 demo 演示了这些接口的用法:
1 | // hello.c |

从 so 库到 Flutter 热更新
将 so 更新/替换应用于 Flutter 热更新技术上完全是可行的。《深入理解计算机系统》第七章第 7.11 节(P468)中讨论了应用程序如何加载和链接共享库。
应用程序还可以在它运行时要求动态链接器加载和链接任意共享库,而无需在编译时链接那些库到应用中。
书中还举了微软 Windows 应用更新的例子:
分发软件。微软 Windows 应用的开发者常常利用共享库来分发软件更新。他们生成一个共享库的新版本。然后用户可以下载,并用它替换当前的版本。下一次他们运行应用程序时,应用将自动链接和加载新的共享库
所以理论上只要 Flutter 不出于系统安全等原因阻止应用动态链接和加载更新后的共享库,动态链接技术同样可以用于热更新。但实践中可能遇到以下几个问题:
- 首先你得要有 so !
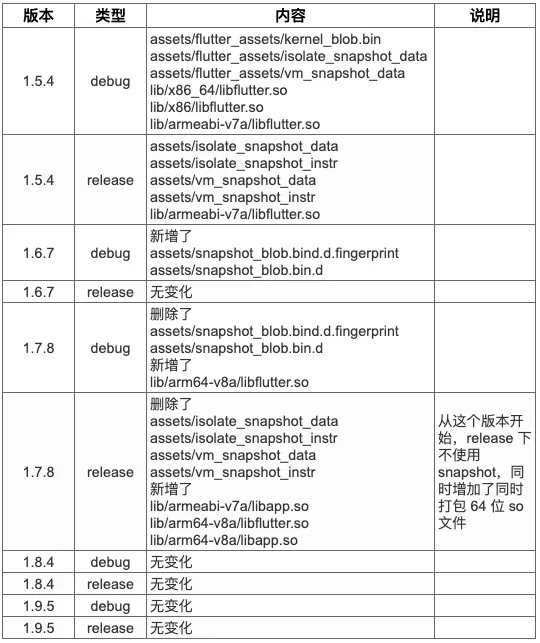
我们知道 Dart 有 JIT 和 AOT 两种不同的编译模式,而 Flutter 是使用 Dart 作为开发语言,其编译产物在 debug 模式和 release 模式下并不相同。Dart 和 Flutter 都在快速演进,编译产物常常随版本发生变化。所以并不是所有编译模式或 Flutter 版本都有 so。没有 so,也就无法替换 so 文件来热更新。好在 Flutter v1.7 版本开始 release 模式下编译产物输出为 so 文件,所以 so 更新/替换方案变得可行
- 其次是加载 so 的过程要可控
我们很容易控制如何加载自己开发的 so 库文件。但第三方库通常会主动加载自带的 so 库文件,典型的代码如下:
1 | public class FooSdk { |
第三方库通常会主动加载 so 的好处是对开发者透明和友好,坏处是不灵活不可控。Flutter 会不会也使用这种写死的加载方式呢?
我们会一步步详细展开,看看实践中是否存在这些问题。如果有,要如何克服?主要话题包括:
- Flutter 编译流程及产物简介
- Flutter 引擎初始化简介
Flutter 编译流程及产物
Dart 支持 JIT 和 AOT 两种编译模式。Flutter 在 debug 模式和 release 模式分别使用 JIT 和 AOT,前者开发调试速度快,后者运行效率高。
使用 Android Studio 或 VS code 来打包 Flutter 应用时,实际都会调用 flutter run 来构建 APK 包。关于 flutter run 命令浅谈Flutter构建中有比较详细的讨论。
忽略一些不必要的细节,我们可以简单地认为:
- 编译 debug 包对应于
flutter build bundle这条命令 - 编译 release 包对应于
flutter build aot; flutter build bundle --precompiled这两条命令
现在来动手实践一下,观察这些命令的编译产物。我的 Flutter 版本如下:
1 | Flutter 1.10.15-pre.234 • channel master • https://github.com/flutter/flutter.git |
flutter create flutter_empty_demo 创建一个新的项目,不对代码作任何改动,利用这个项目进行验证。
编译 debug 包
运行 flutter build bundle 并观察建产物。这条命令本质是通过以下代码构造出一条类似于 dart <参数1> <参数2> ... <参数n> 带复杂参数的命令。主要代码包括:
- compile.dart - 对 Flutter SDK 中
dart命令的包装,提供KernelCompiler - bundle.dart - 基于
KernelCompiler提供BundleBuilder - build_bundle.dart - 基于
BundleBuilder来实现flutter build bundle命令
这条命令没有任何提示,等待约2秒后项目根目录下多出 build/flutter_assets 文件夹。
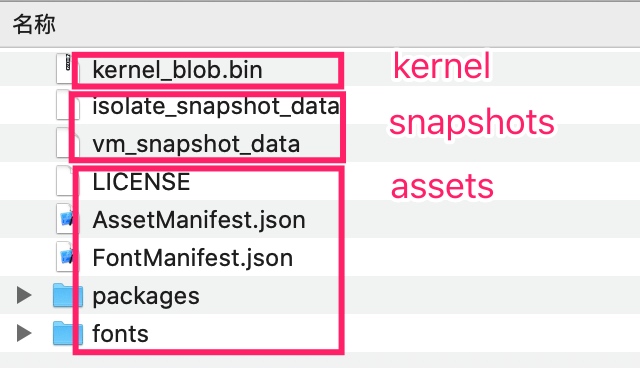
- kernel - kernel 是从 Dart 本身衍生出来的语言,用于 Dart 程序的中间格式。这里的
kernel_blob.bin即我们应用中编写的 Dart 代码 - snapshots - Dart 虚拟机的状态
- assets - 图片、字体等资源
编译 release 包
运行 flutter build aot 并观察建产物。同样地,这条命令本质是通过以下代码构造出一条类似于 dart <参数1> <参数2> ... <参数n> 的带复杂参数的命令。主要代码包括:
- build.dart - 对 Flutter SDK 中
dart命令的包装,提供AOTSnapshotter,可以将 Dart 代码编译成 so - build_aot.dart - 基于
BundleAOTSnapshotterBuilder来实现flutter build aot命令
这条命令耗时比编译 debug 包稍长,输出如下:

执行成功后项目根目录下多出 build/aot 目录,我们的 Dart 代码被编译成这里的 app.so。
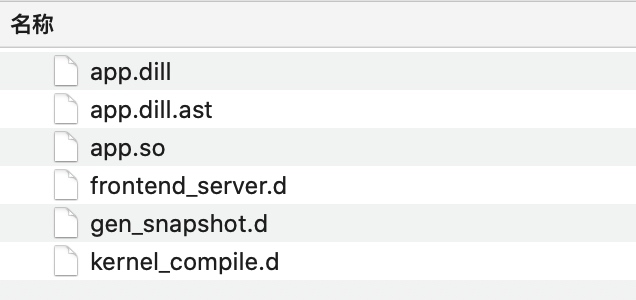
app.so 是可以将 Tinker so 替换用于 Flutter 更新的关键之一。实际上, Flutter 一开始并不是编译成 app.so,而是多次调整直到 1.7 版本开始输出为 app.so,直到目前最新版本 (V1.9)。
(注:图片来自 浅谈Flutter构建)
通过对比相关代码可以看到,编译产物的变更其实只不过是 snapshot_kind 参数的调整:从 V1.7 的 app-aot-blobs 调整到 V1.9 的 app-aot-elf
Flutter V1.9 AOTSnapshotter 代码片断
1 | final String assembly = fs.path.join(outputDir.path, 'snapshot_assembly.S'); |
Flutter V1.5 AOTSnapshotter 代码片断
1 | final String assembly = fs.path.join(outputDir.path, 'snapshot_assembly.S'); |
Flutter 引擎初始化
FlutterMain 用于初始化 Flutter 引擎。这里只讨论跟 libapp.so 加载相关的部分 (libapp.so 即上文的 app.so)。
1 | /** |
带你不到80行代码搞定Flutter热更新 使用反射强行修改 FlutterMain.sAotSharedLibraryName,使其指向由 Tinker 管理的 so,从而实现热更新。不过从 V1.9 代码看似乎有更优雅的方案:
- 首先
sAotSharedLibraryName并非final字段,为的就是能从文件中读取配置 - 其次,
initConfig()方法的注释提到在AndroidManifest.xml中添加一个名为FlutterMain.aot-shared-library-name的<meta-data>可以为sAotSharedLibraryName指定值 - 最后,
FlutterMain.ensureInitializationComplete()方法的第二个参数args也会被添加到shellArgs变量中。所以可以按照格式添加额外的参数--AOT_SHARED_LIBRARY_NAME=<so文件>让 Flutter 引擎加载指定的 so 库。
so 替换应用于 Flutter 热更新是可行的,原因包括:
- Flutter 1.7 之后编译产物输出为
libapp.so文件,完全可以直接复用 Tinker 作为热更新框架 - 能使用反射等方式将 Flutter 加载 so 库的过程变得可控,比如从指定的路径加载更新/替换后的 so 库
总结
最后来简单回答下前面提出的几个问题,作为总结。
- Tinker 如何实现 so 更新/替换?
Tinker 实际上是调用 System.load() 来 so 实现更新/替换。 虽然 so 更新/替换并不是 Tinker 独有的,我们完全可以直接调用 System.load() 来实现 so 更新,但考虑 Tinker 的 patch 包生成和合并非常完善(可以生成很小的差分包),工程实际中是个不错的选择。
System.load()的执行流程是怎样的?
System.load() 调用 Runtime 相关方法,最终进入到 Java 虚拟机中的 java_vm_ext.LoadNativeLibrary() 方法。该方法调用 dlopen() 和 dlsysm() 加载 so 文件
- Flutter 大致的编译流程是怎样的?
调用 dart 命令将应用中的 Dart 代码编译成某种类型的 snapshot 文件,常用的 snapshot-kind 包括 kernel、app-aot-elf 和 app-aot-blobs。 (这里仍然有个疑问,为什么 Dart 官网并没有提到 app-aot-elf 和 app-aot-blobs 这两种类型的 snapshot-kind?)
- Flutter 编译产物是什么,有什么变更?
编译产物包括 1. 资源 (assets) 2. 代码 (kernel/so库 和 snapshots)
- so 替换如何应用于 Flutter 热更新?
通过反射等方式修改 FlutterMain.sAotSharedLibraryName 字段,将缺省的 libapp.so 替换为指定的 so
- Flutter 及其编译产物的变更对上述方案有哪些潜在的影响?
Fluter 1.7 版本之前编译产物并非 so 文件,所以不能直接利用 so 替换来实现热更新。1.7 版本之后编译产物输出为 so 文件,可以利用 so 替换来实现热更新。
但是要注意,so 替换方案虽然可行,Flutter 的代码仍在频繁变更中,所以使用反射等手段时要尤其注意 Flutter 版本带来的影响。比方说,Flutter 1.9 中反射方式修改 FlutterMain.sAotSharedLibraryName 是可行的,但 Flutter 1.12 中则会失败。原因很简单:1.12 新版本中 FlutterMain 被重构成 FlutterMain 和 FlutterLoader,原先用于加载 libapp.so 的代码现移到 FlutterLoader 中了,包括 sAotSharedLibraryName 字段。具体可参考源码。
- Flutter 1.9 - engine/FlutterMain.java
- Flutter 1.12 - engine/FlutterMain.java 和 engine/FlutterLoader.java