Flutter UI 问题分析小结
我们的 Flutter 项目中自定义 AppBar 时 SafeArea 误用导致出现一个奇怪的 UI 问题。本文从这个问题出发,简单梳理了 Android 和 iOS 平台在 AppBar 视觉规范上的差异,然后使用 Dart DevTools 分析并成功解决问题。
[TOC]
问题背景
需求描述
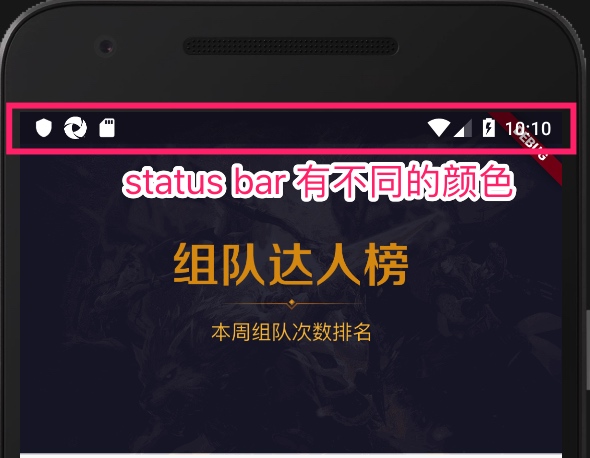
最近我们项目接入 Flutter 并重写一些简单页面。项目中很多 Native 页面的 AppBar (为简单起见,本文将 Android 的 ActionBar/Toolbar 以及 iOS 的 Navigation Bar 统称为 AppBar)有类似这样的交互效果,

Flutter 页面也需要实现这种交互。一种做法是 Flutter 页面中保留原有的 Native AppBar,在 Flutter 列表滚动时通过 MethodChannel 通知 Native AppBar 更新其背景。不妨称这个方案为 Native 方案。另外一种做法是隐藏原有 Native AppBar,直接在 Flutter 层实现相同交互。这个方案称为 Flutter 方案。
显然,Native 方案实现起来较为繁琐,且似乎偏离了 MethodChannel 的合理使用场景。而 Flutter 方案可以避免跟 Native 层不必要的通信,所以我们选择了该方案。
Flutter 方案
FortnightlyDemo (Flutter 官方 example)实现了自定义的 ShortAppBar:
ShortAppBar 简化后的代码如下。
1 | class FortnightlyDemo extends StatelessWidget { |
注意这里一个细节,从视觉效果上来看这里的 ShortAppBar 并没有延伸到 Status Bar 下方,
参考 ShortAppBar 的代码并加上必要的交互,我很快就实现了 CustomAppBar。
而我们项目中要求 CustomAppBar 能延伸 Status Bar 下方。给 SafeArea 套上一个 Container 就可以实现这种效果。
1 | Container( |

遇到的问题
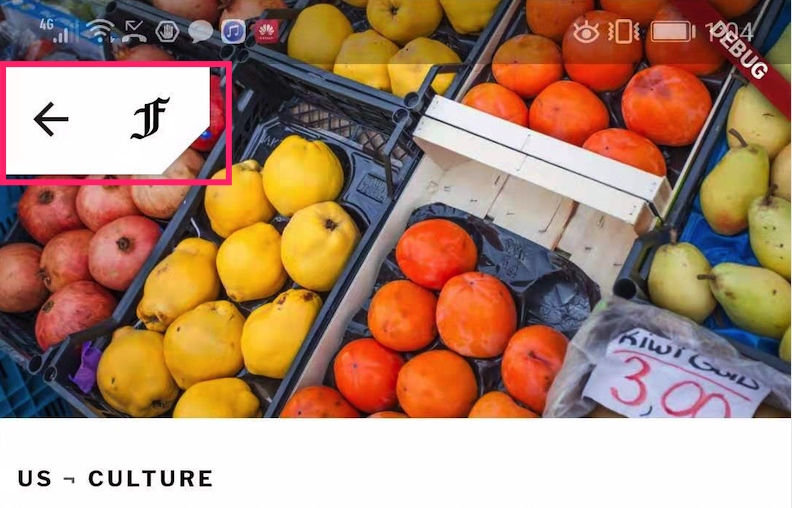
CustomAppBar 在 Android 上的效果还不错,在 iPhone 7 上也能接受(高度偏大一点点),但在 iPhone 11 上的实际效果显得很违和了:

如上图,CustomAppBar 在 iPhone 11 上比原生应用的 AppBar 严重偏高。
问题分析
为什么 CustomAppBar 在 Android 机器上看起来很好,在 iOS (尤其是 iPhone 11)上却严重偏高?
Flutter 可以在 Android 平台和 iOS 平台上在像素级别无差别地进行绘制,这是它的强大之处。但不容忽视的是,Android 视觉规范天生跟 iOS 有差异,如果不考虑并尊重这些差异而强行无差别绘制,肯定会导致某一端看起来怪怪的。
所以很显然问题的一个原因是 CustomAppBar 的实现没有考虑平台差异。另一个原因则是 SafeArea 的误用导致 CustomAppBar 进一步偏高。接下来就这两个原因分别展开。
视觉规范的差异
首先得承认 Android 和 iOS 视觉上天生存在某些不一致。 (这也是 Flutter 分别提供 material 和 cupertino 风格控件的原因)
根据 iOS Navigation Bar 设计规范,标准的 AppBar 高度是 44pt (不包括 Status Bar)。
根据 Android Material Design 设计规范,Status Bar 高度是 24dp,标准的 AppBar(Action Bar) 高度是 56dp。
Gitme 是用 Flutter 实现的应用,不过它是 Material Design 风格的,在 iOS 上看起来是这样:
总觉得哪里怪是不是?没错,这里的 AppBar 太高!
所以第一个改进就是根据当前系统为 CustomAppBar 选择合适的高度。修改后的示意代码如下:
1 | class CustomAppBar extends StatelessWidget { |
事实上,Flutter 分别为 material 和 cupertino 提供了符合各自设计规范的 AppBar 和 CupertinoNavigationBar,以简化应用开发。
你可能会问,既然有了 AppBar 和 CupertinoNavigationBar,能不能这样处理?
1 | class AnotherCustomAppBar extends StatelessWidget { |
AnotherCustomAppBar 理论上更简单优雅,但实践发现有以下问题:
AppBar的高度是 56dp,而我们Android端应用的规范是 50dp,所以需要调整AppBar高度AppBar在 Android 端缺并不是沉浸式风格(status bar 和 AppBar 背景色不同),所以需要对其进行适配CupertinoNavigationBar背景色设置成透明仍然会遮挡背景图片 (why?)

再考虑到后期可能还会给自定义的 AppBar 添加更多功能,直接使用 Flutter SDK 提供的 AppBar 和 CupertinoNavigationBar 相对不可控,所以放弃了 AnotherCustomAppBar 方案。
SafeArea 的误用
视觉规范差异能在一定程度解释 CustomAppBar 在 iOS 上高度过大的问题。但考虑到其实这个差异不太大 (56-44=12,应该只相差12个逻辑单位),跟视觉上看到的高度偏差有所不符,所以仍然让人疑惑是否存在其他问题。
肉眼感觉这里的 AppBar 怕不止 56pt 吧? 不过肉眼不靠谱,还是上工具实测。
UI 分析
DevTools 是 Dart 和 Flutter 下的性能测试与 bug 调试的工具。它的功能包括:
- 检查 Flutter UI 布局
- 检查 Flutter app 性能问题
- 源码调试
- 内存诊断
我们这里重点关注检查 Flutter UI 布局的功能。用法如下:
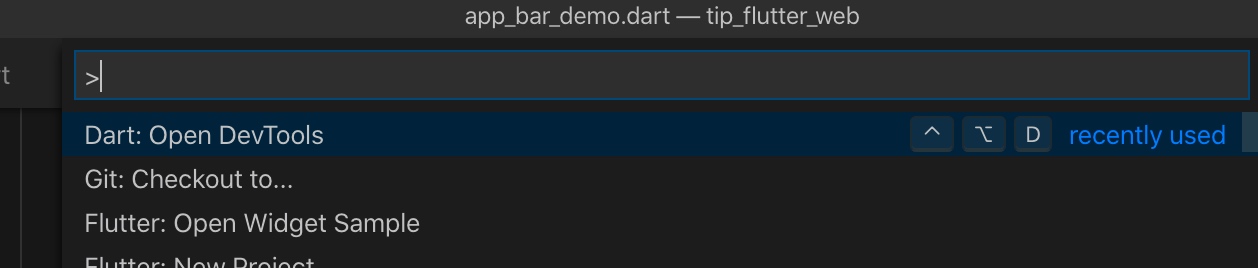
第一步,通过 flutter attach 连上 App 后,从 IDE 打开 DevTools。VS Code 使用 ⇧⌘P 调出如下窗口然后选择 “Open DevTools”
第二步,在打开的浏览器窗口中按以下步骤操作就可以检查目标 Widget。

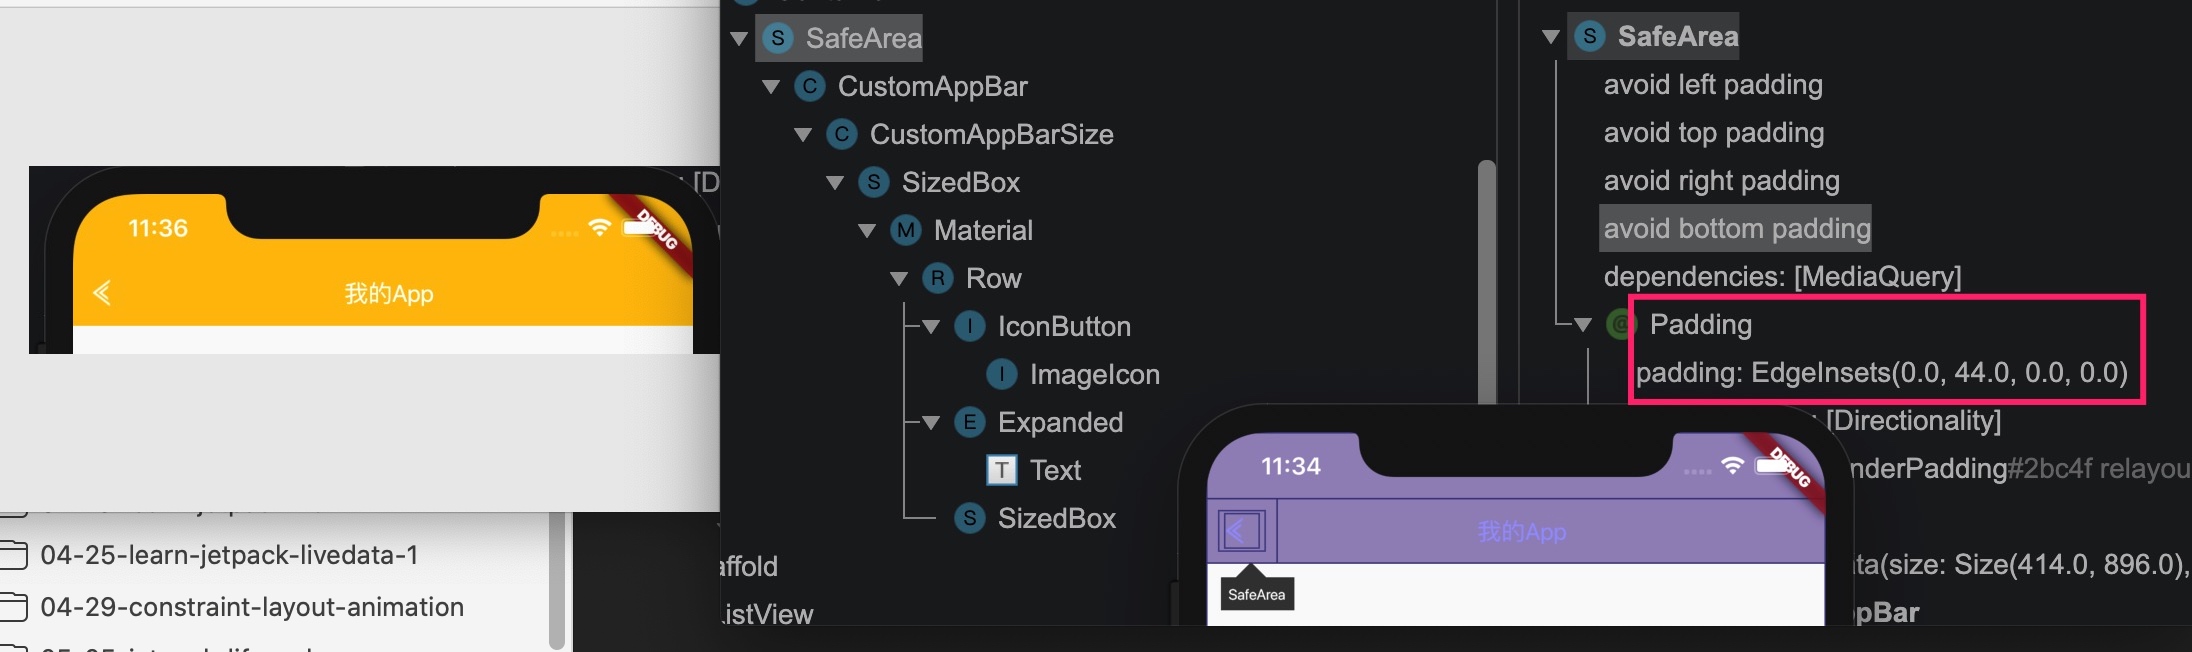
我们感兴趣的 Widget 是 CustomAppBar。以下三张图从不同角度近距离观察它。
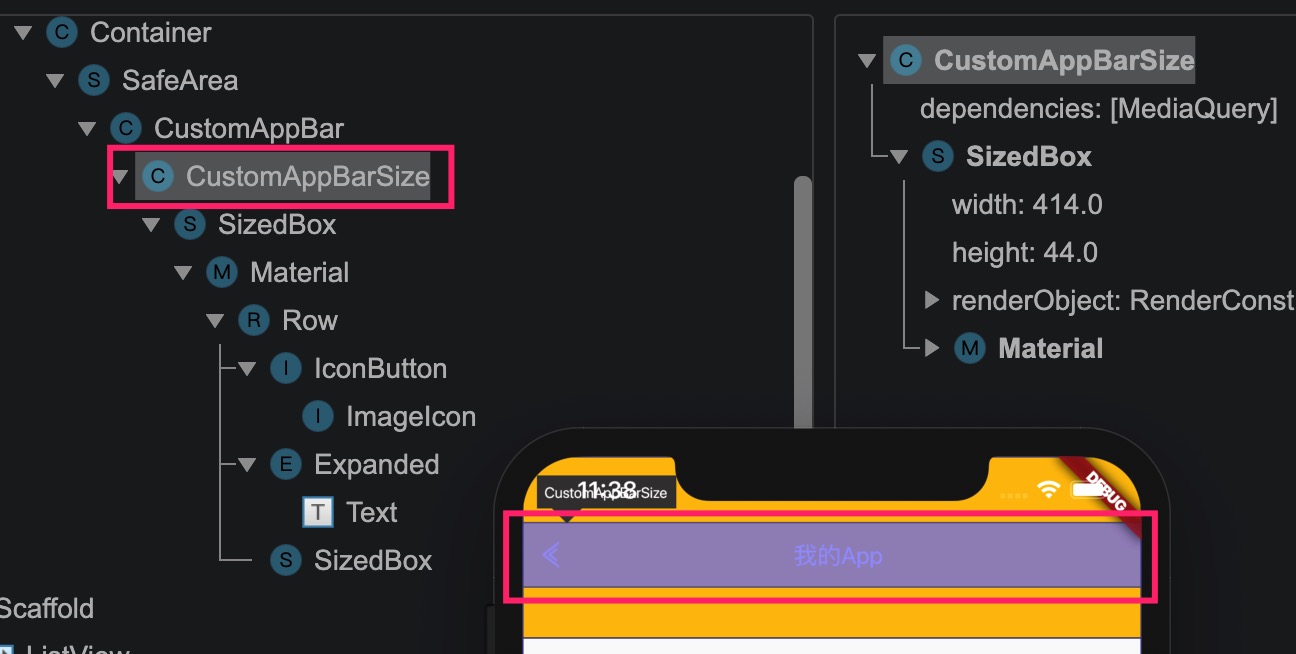
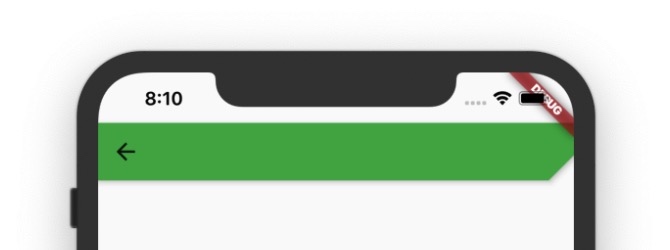
图一,从图中可以看出 CustomAppBar 的高度其实没有问题,正是预期中的 44pt (CustomAppBar 高度由 CustomAppBarSize 限制)
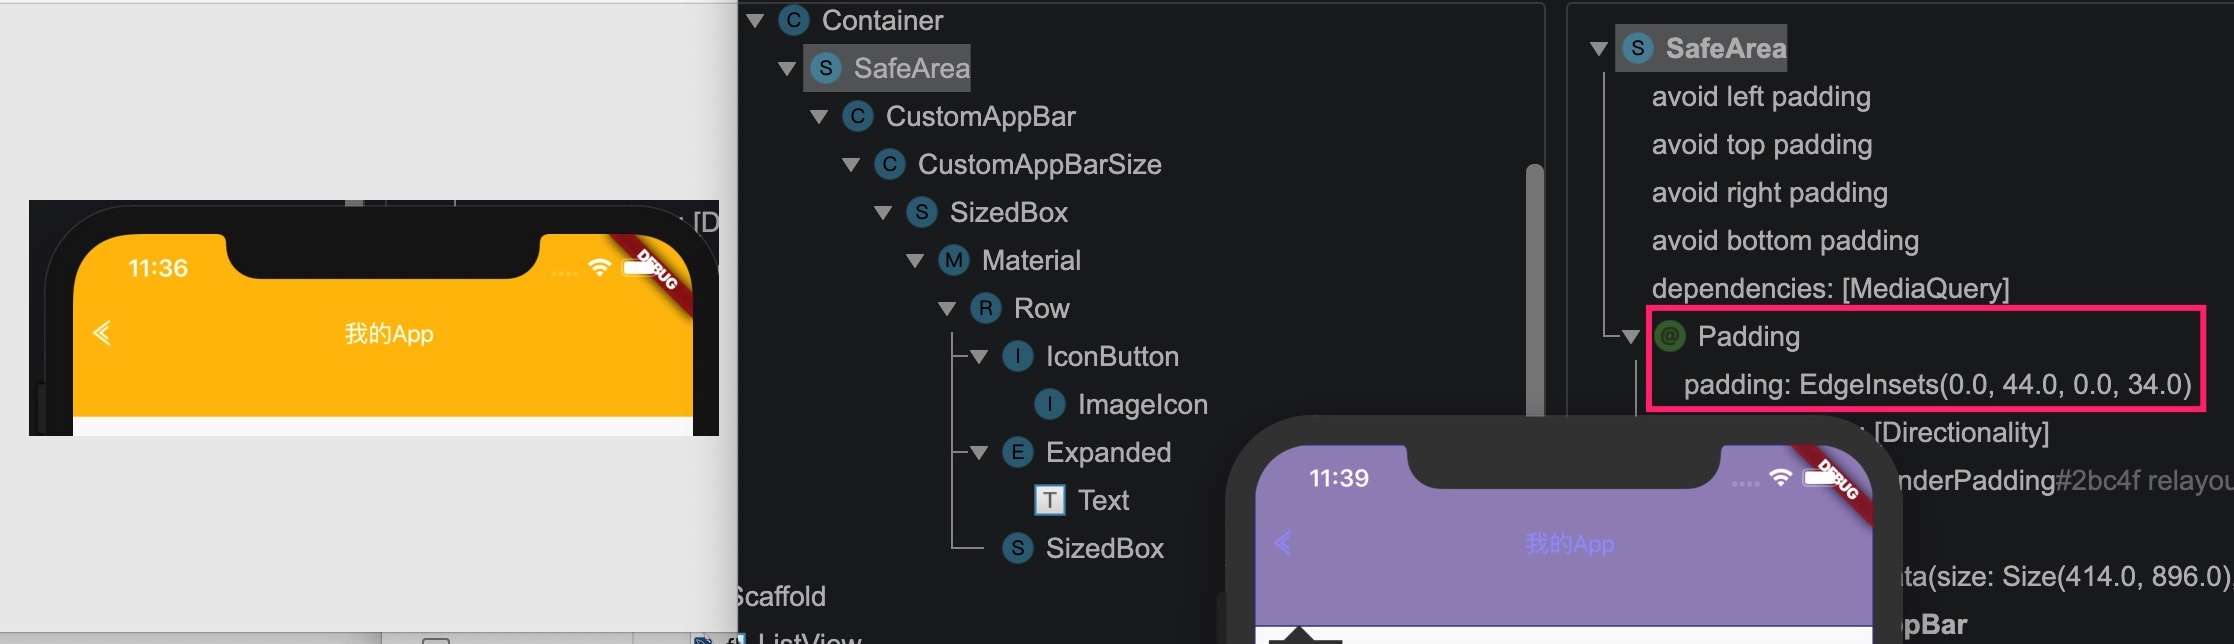
图二,从图中可以看出 CustomAppBar 的高度看似偏高很多。
- 可以看到红色框中的
SafeArea为CustomAppBar添加了一个不正常的Padding,bottom padding 为 34 Padding本身是不可见的,所以通常不会有影响。不过SafeArea的父节点是一个可见的Container,所以看起来 AppBar 偏高
图三,图中的 CustomAppBar 的高度正常。
SafeArea同样为CustomAppBar添加了Padding。不过这一回,bottom padding 为0SafeArea的父节点同样是一个可见的Container,但由于 bottom padding 为0,所以看起来 AppBar 高度正常
至此可以初步定位到问题跟 SafeArea 有关(我们使用 SafeArea 来适配刘海屏设备)。继续分析前先快速了解下 SafeArea。如果你熟悉这个 Widget 建议直接略过下一节。
SafeArea 介绍
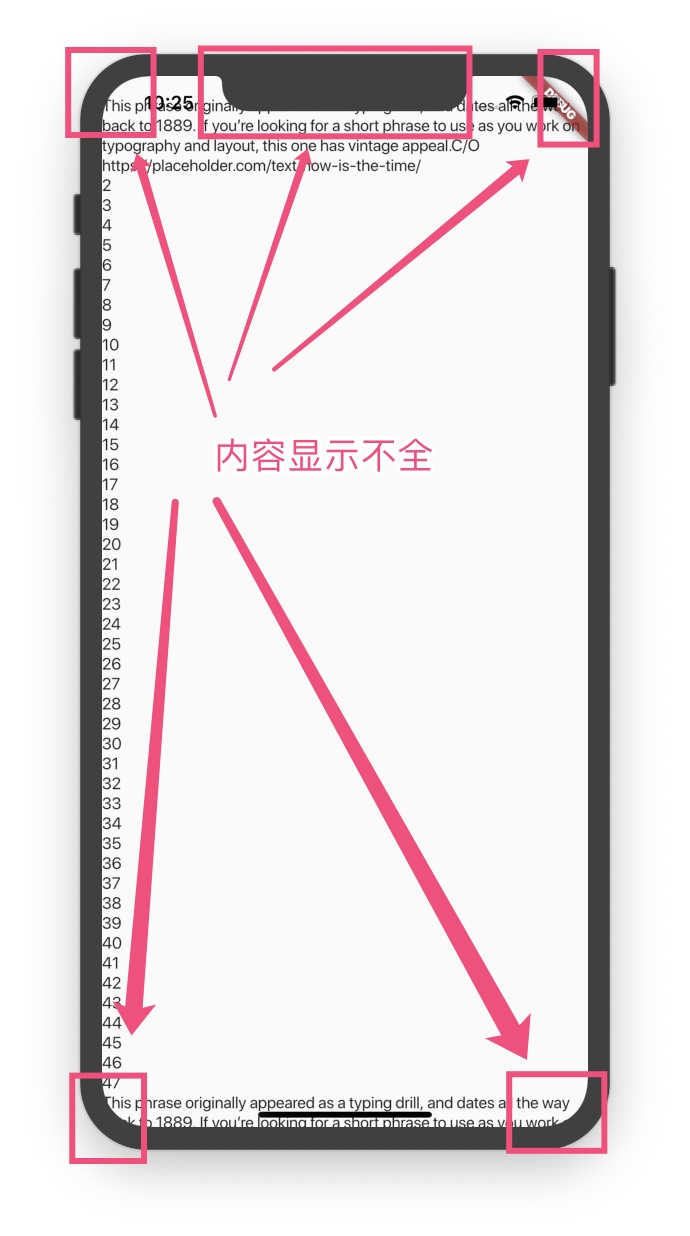
再来说说 SafeArea。iPhone X 首次使用刘海屏,并且屏幕的可显示区域也不再是方方正正的了。这就带来如下一个问题:
所以也就有了 SafeArea。这个视频简单生动地介绍了 SafeArea。
SafeArea 的代码很少,所以这里就直接贴上来了。
1 | /// A widget that insets its child by sufficient padding to avoid intrusions by |
本质上来说,SafeArea 会主动为其 child 加上 Padding 以避免 UI 超出屏幕。
SafeArea的四个属性left,top,right,bottom分别用于控制是否对 child 的各个边界做 safe 处理- 需要特别注意的是,**这四个属性默认是
true**。
问题小节
为了适配 iPhone X 等设备,我们会为 CustomAppBar 给添加 SafeArea 以避免内容显示不全。为了保证 CustomAppBar 能延伸到 Status Bar 下方,又在最外层加上了 Container 。适配代码如下:
1 | Container( |
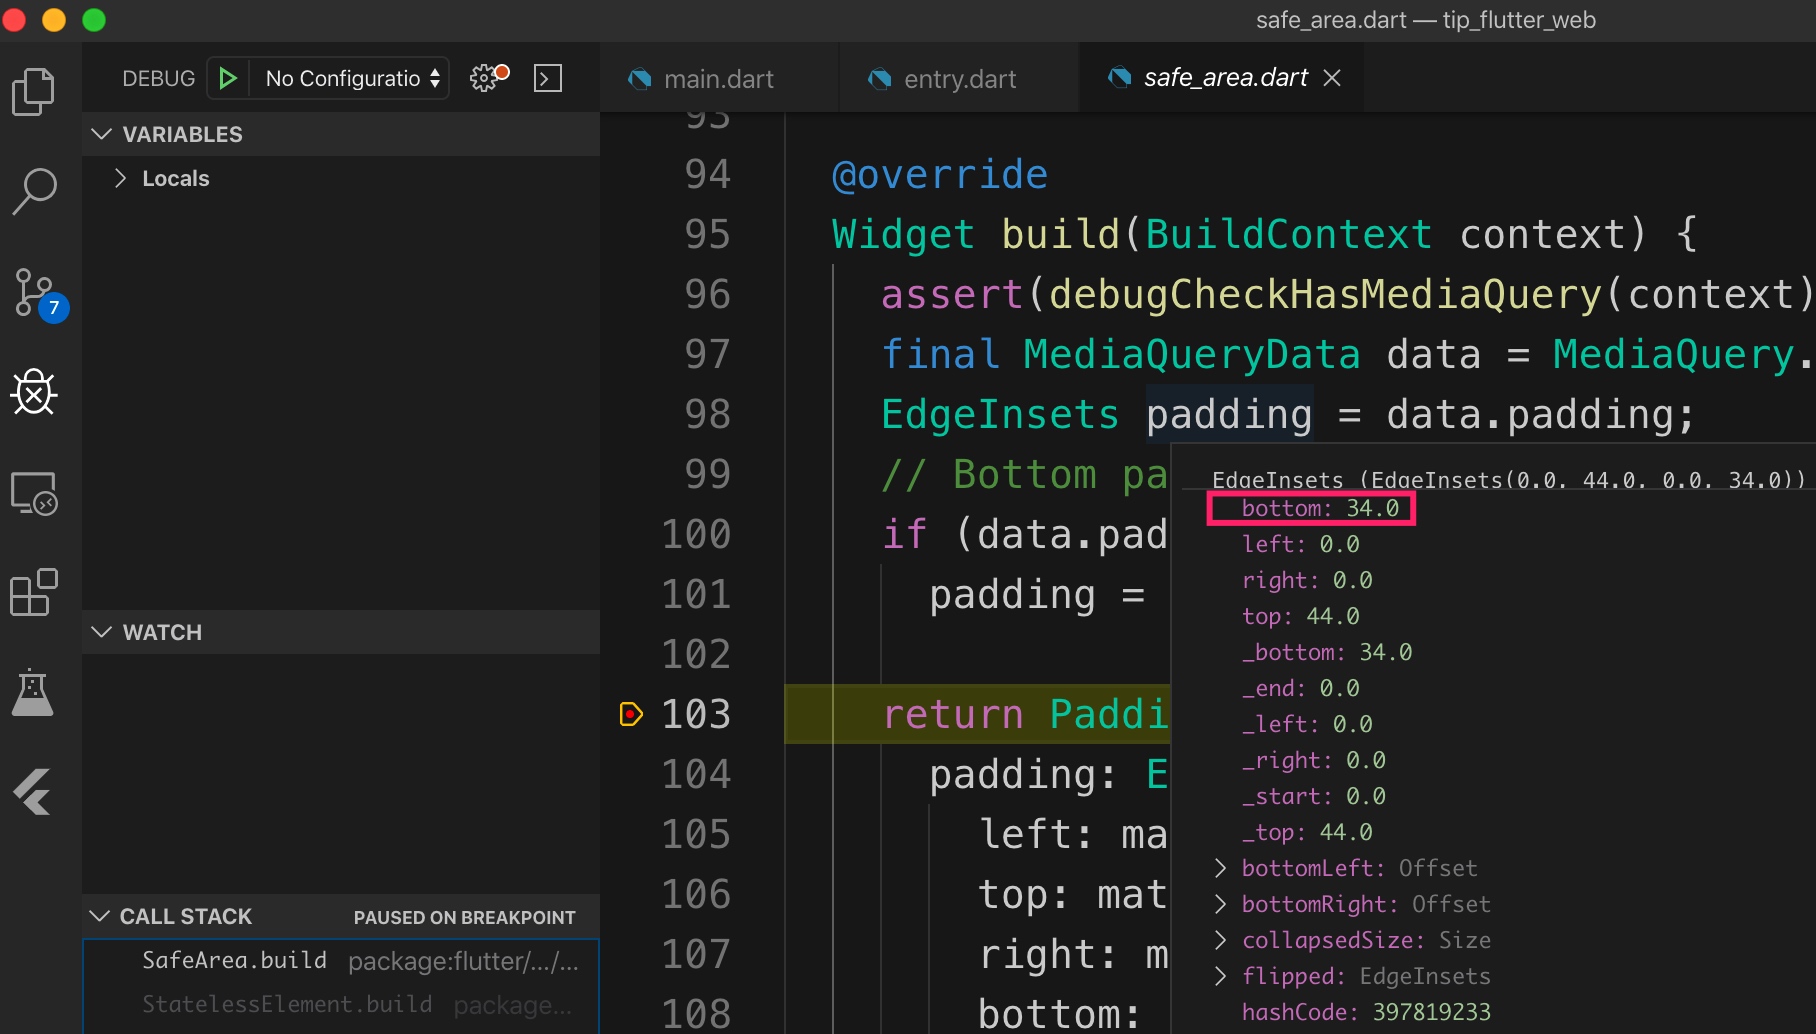
SafeArea 底层调用 MediaQuery.of 来构建合理的 Padding 对象。一开始我并没有注意到 MediaQuery.of(context).padding.bottom 的返回值在不同机型上有区别。比如,由于是带圆角的屏幕,在 iPhone 11 上 MediaQuery.of(context).padding.bottom 返回值为 34pt。而在方形屏幕上该值为 0pt。见下图:
另一方面,我没有注意到 SafeArea.bottom 值默认为 true。所以这里的 padding.bottom 返回的 34pt 被错误地用作 CustomAppBar 的 bottom padding,而最外层带红色背景的 Container 会让 Padding 占据的区域变得可见。
最终,各种因素的综合影响导致 CustomAppBar 高度看起来严重偏大,如下图:
找到原因后,对代码进行第二个改进:指定 SafeArea.bottom 为 false。至此,问题解决!
1 | SafeArea( |
补充:为什么 CupertinoNavigationBar 不会有高度问题,它是怎么处理的?
我翻了下源码,果然也是将 bottom 设置为 false。
1 | // flutter/packages/flutter/lib/src/cupertino/nav_bar.dart |
这从另一个角度印证了前面的分析以及解决方法是正确的。
总结
本文记录了 Flutter 项目中自定义 AppBar 时遇到的一个 UI 问题。问题主要原因在于:
- Android 和 iOS 视觉规范的差异
SafeArea的误用
先从讨论了Android 和 iOS 视觉规范的差异对 Flutter UI 开发可能存在的影响,并使用 Dart DevTools 对 SafeArea 误用问题进行分析。
再梳理了 SafeArea 的误用是如何影响 CustomAppBar 的高度的。
- 首先,
SafeArea缺省的bottom为true - 第二,iPhone 11 上
MediaQuery.of(context).padding.bottom返回值为34pt - 最后,
Container导致由SafeArea添加的Padding占据的区域可见
基于上述分析对 CustomAppBar 的进行两处改进,
- 根据当前系统为
CustomAppBar选择合适的高度 - 确保正确使用
SafeArea,避免产生不正确的可见区域。记住这两点,SafeArea会为内层的 child 添加PaddingSafeArea外层的Container会导致Padding占据的区域可见
通过这两处改进,成功解决自定义 AppBar 高度过大的问题,完美适配 iPhone 11。