Glide transform 问题分析

Glide 很强大也很复杂。多数时候 Glide 可以提高我们的生产力,也有少数时候我们不小心会踩到坑里。本文来自一个真实案例:布局文件中一处不起眼的疏忽,导致 Glide 生成一个超大的 Bitmap。

问题描述

上图中的英雄头像上有一个小角标,角标大小为180x180像素。但我们通过 Bitmap Profiler 看到的这个角标对应的 Bitmap 大小超过 4MB,显然不合理。

问题分析

为了容易定位问题,我写了一个 demo 来进行分析。demo 源码见 Github

图一

上图中分别使用 Glide 和 Picasso 加载图片。结果,

  • 第一次使用 Glide 加载图片,这时生成了两个 Bitmap
  • 第二次使用 Picasso 加载图片,这时只生成一个 Bitmap

由此可以初步断定,Glide 加载图片会多生成一个 Bitmap。

图二

上图中只使用 Glide 加载图片,两次加载稍有不同:

  • 第一次使用 Glide 加载图片时调用 dontTransform() 方法,这时只生一个 Bitmap
  • 第二次使用 Glide 加载图片不调用 dontTransform(),这时生成了两个 Bitmap

由此可以初步断定,Glide 加载图片时的 transform 处理导致多生成一个 Bitmap。

为什么生成大的 Bitmap

Glide 对原始 Bitamp 进行 transform 处理导致生成新的 Bitmap 对象,这是可以理解的。但是问题是,原始图片只有180x180像素,为什么生成了4MB的 Bitmap?

Transform 分析

Glide 加载图片过程比较复杂,所以我们只挑相关步骤来说,忽略不相关细节。另外,简单起见这里的讨论暂不考虑图片缓存问题,认为所有的图片都是从服务器上拉取的。

下面从以下几个方面进行讨论:

  • 获取控件大小 - getSize()
  • Bitmap 变换 - transform()
  • transformation 的选择策略

getSize()

Glide 实际发请求加载图片前有一个判断当前 Target 大小的过程。这里 Target 通常是指 ViewTarget

获取当前 ViewTarget 大小的原因很简单:将一个大小超过控件实际大小的 Bitmap 显示在控件上显然是不合理的。所以 Glide 加载图片前会先获取控件实际大小,后面按这个实际大小 transform 成一个尺寸更小的 Bitmap。Glide 的磁盘缓存对象也是 transform 后的 Bitmap,这样通常可以更省存储空间,并且之后读取磁盘缓存性能也更好。不过其他一些图片加载库,比如 Picasso,并没有进行类似的处理。

获取当前 ViewTarget 大小是从 ViewTarget.getSize(SizeReadyCallback cb) 方法开始的。

  • 首先,检查 View.getWidth()View.getHeight()。如果其中某一个为0,进入下一步。否则,结束
  • 检查 view 的 LayoutParams。如果其中宽和高其中某一个小于等于0,进入下一步。否则,结束
  • 创建 SizeDeterminerLayoutListener,等待 measure 过程结束。结束后回调 SizeDeterminerLayoutListener

代码如下:

1
2
3
4
5
6
7
8
9
10
11
12
13
14
15
16
17
18
19
20
21
22
23
24
25
26
27
28
29
public void getSize(SizeReadyCallback cb) {
int currentWidth = getViewWidthOrParam();
int currentHeight = getViewHeightOrParam();
if (isSizeValid(currentWidth) && isSizeValid(currentHeight)) {
cb.onSizeReady(currentWidth, currentHeight);
} else {
...
}
}

private int getViewWidthOrParam() {
final LayoutParams layoutParams = view.getLayoutParams();
if (isSizeValid(view.getWidth())) {
return view.getWidth();
} else if (layoutParams != null) {
return getSizeForParam(layoutParams.width, false /*isHeight*/);
} else {
return PENDING_SIZE;
}
}

private int getSizeForParam(int param, boolean isHeight) {
if (param == LayoutParams.WRAP_CONTENT) {
Point displayDimens = getDisplayDimens();
return isHeight ? displayDimens.y : displayDimens.x;
} else {
return param;
}
}

获取 ViewTarget 大小一般不会有什么问题。但是,如果 ImageView 宽高为 wrap_content 时就要小心了。以下面布局为例,

1
2
3
4
5
6
7
8
9
10
11
12
13
14
15
16
17
18
19
20
21
22
23
24
25
26
27
28
29
30
31
32
33
34
35
<?xml version="1.0" encoding="utf-8"?>
<android.support.constraint.ConstraintLayout xmlns:android="http://schemas.android.com/apk/res/android"
xmlns:app="http://schemas.android.com/apk/res-auto"
xmlns:tools="http://schemas.android.com/tools"
android:layout_width="match_parent"
android:layout_height="match_parent"
tools:context=".MainActivity">

<RelativeLayout
android:layout_width="90dp"
android:layout_height="140dp"
android:gravity="center_horizontal"
app:layout_constraintEnd_toEndOf="parent"
app:layout_constraintStart_toStartOf="parent"
app:layout_constraintTop_toTopOf="parent">

<ImageView
android:id="@+id/iv_bg"
android:layout_width="90dp"
android:layout_height="140dp"
android:layout_gravity="center_horizontal"
android:background="@color/colorAccent"
android:scaleType="fitXY" />

<ImageView
android:scaleType="fitStart"
android:id="@+id/iv_tag"
android:layout_width="wrap_content"
android:layout_height="wrap_content"
android:layout_alignStart="@id/iv_bg"
android:layout_alignTop="@id/iv_bg"
/>

</RelativeLayout>
</android.support.constraint.ConstraintLayout>

注意 iv_tag 这个 ImageView 的宽高为 wrap_content。但是按照上述代码逻辑,Glide 认为 iv_tag 这个控件的大小是 1080x2150 (即当前屏幕大小)!

我打断点看了下,确认无误。

-w1612

transform()

Glide 从后台拉取到图片后并解码为 Bitmap,即下面代码中的 decoded。但 Glide 并不是将 decoded 直接显示在控件上,而是先 transform() 得到一个新的 Bitmap transformed。具体的 transform 由 transformation.transform() 完成。

1
2
3
4
5
6
7
8
9
10
11
12
13
14
15
16
17
18
19
20
21
22
23
24
25
26
27
28
29
30
31
32
33
public Resource<Z> decodeFromSource() throws Exception {
Resource<T> decoded = decodeSource();
return transformEncodeAndTranscode(decoded);
}

private Resource<Z> transformEncodeAndTranscode(Resource<T> decoded) {
long startTime = LogTime.getLogTime();
Resource<T> transformed = transform(decoded);
if (Log.isLoggable(TAG, Log.VERBOSE)) {
logWithTimeAndKey("Transformed resource from source", startTime);
}

writeTransformedToCache(transformed);

startTime = LogTime.getLogTime();
Resource<Z> result = transcode(transformed);
if (Log.isLoggable(TAG, Log.VERBOSE)) {
logWithTimeAndKey("Transcoded transformed from source", startTime);
}
return result;
}

private Resource<T> transform(Resource<T> decoded) {
if (decoded == null) {
return null;
}

Resource<T> transformed = transformation.transform(decoded, width, height);
if (!decoded.equals(transformed)) {
decoded.recycle();
}
return transformed;
}

这里的 transformation 为 FitCenterFitCenter 似乎与 iv_tagscaleType 属性对应不上,稍后我们在讨论 transformation 选择策略时再来说这个问题。

FitCenter 实际上是调用 TransformationUtils.fitCenter() 方法来处理原始的 Bitmap。

1
2
3
4
5
6
7
8
9
10
11
12
13
14
15
16
17
18
19
20
21
22
23
24
25
26
27
28
29
30
31
32
33
34
35
36
37
38
39
40
41
42
43
44
45
46
47
48
49
50
51
52
53
54
55
56
57
58
/**
* Scales the image uniformly (maintaining the image's aspect ratio) so that one of the dimensions of the image
* will be equal to the given dimension and the other will be less than the given dimension.
*/
public class FitCenter extends BitmapTransformation {
@Override
protected Bitmap transform(BitmapPool pool, Bitmap toTransform, int outWidth, int outHeight) {
return TransformationUtils.fitCenter(toTransform, pool, outWidth, outHeight);
}
}
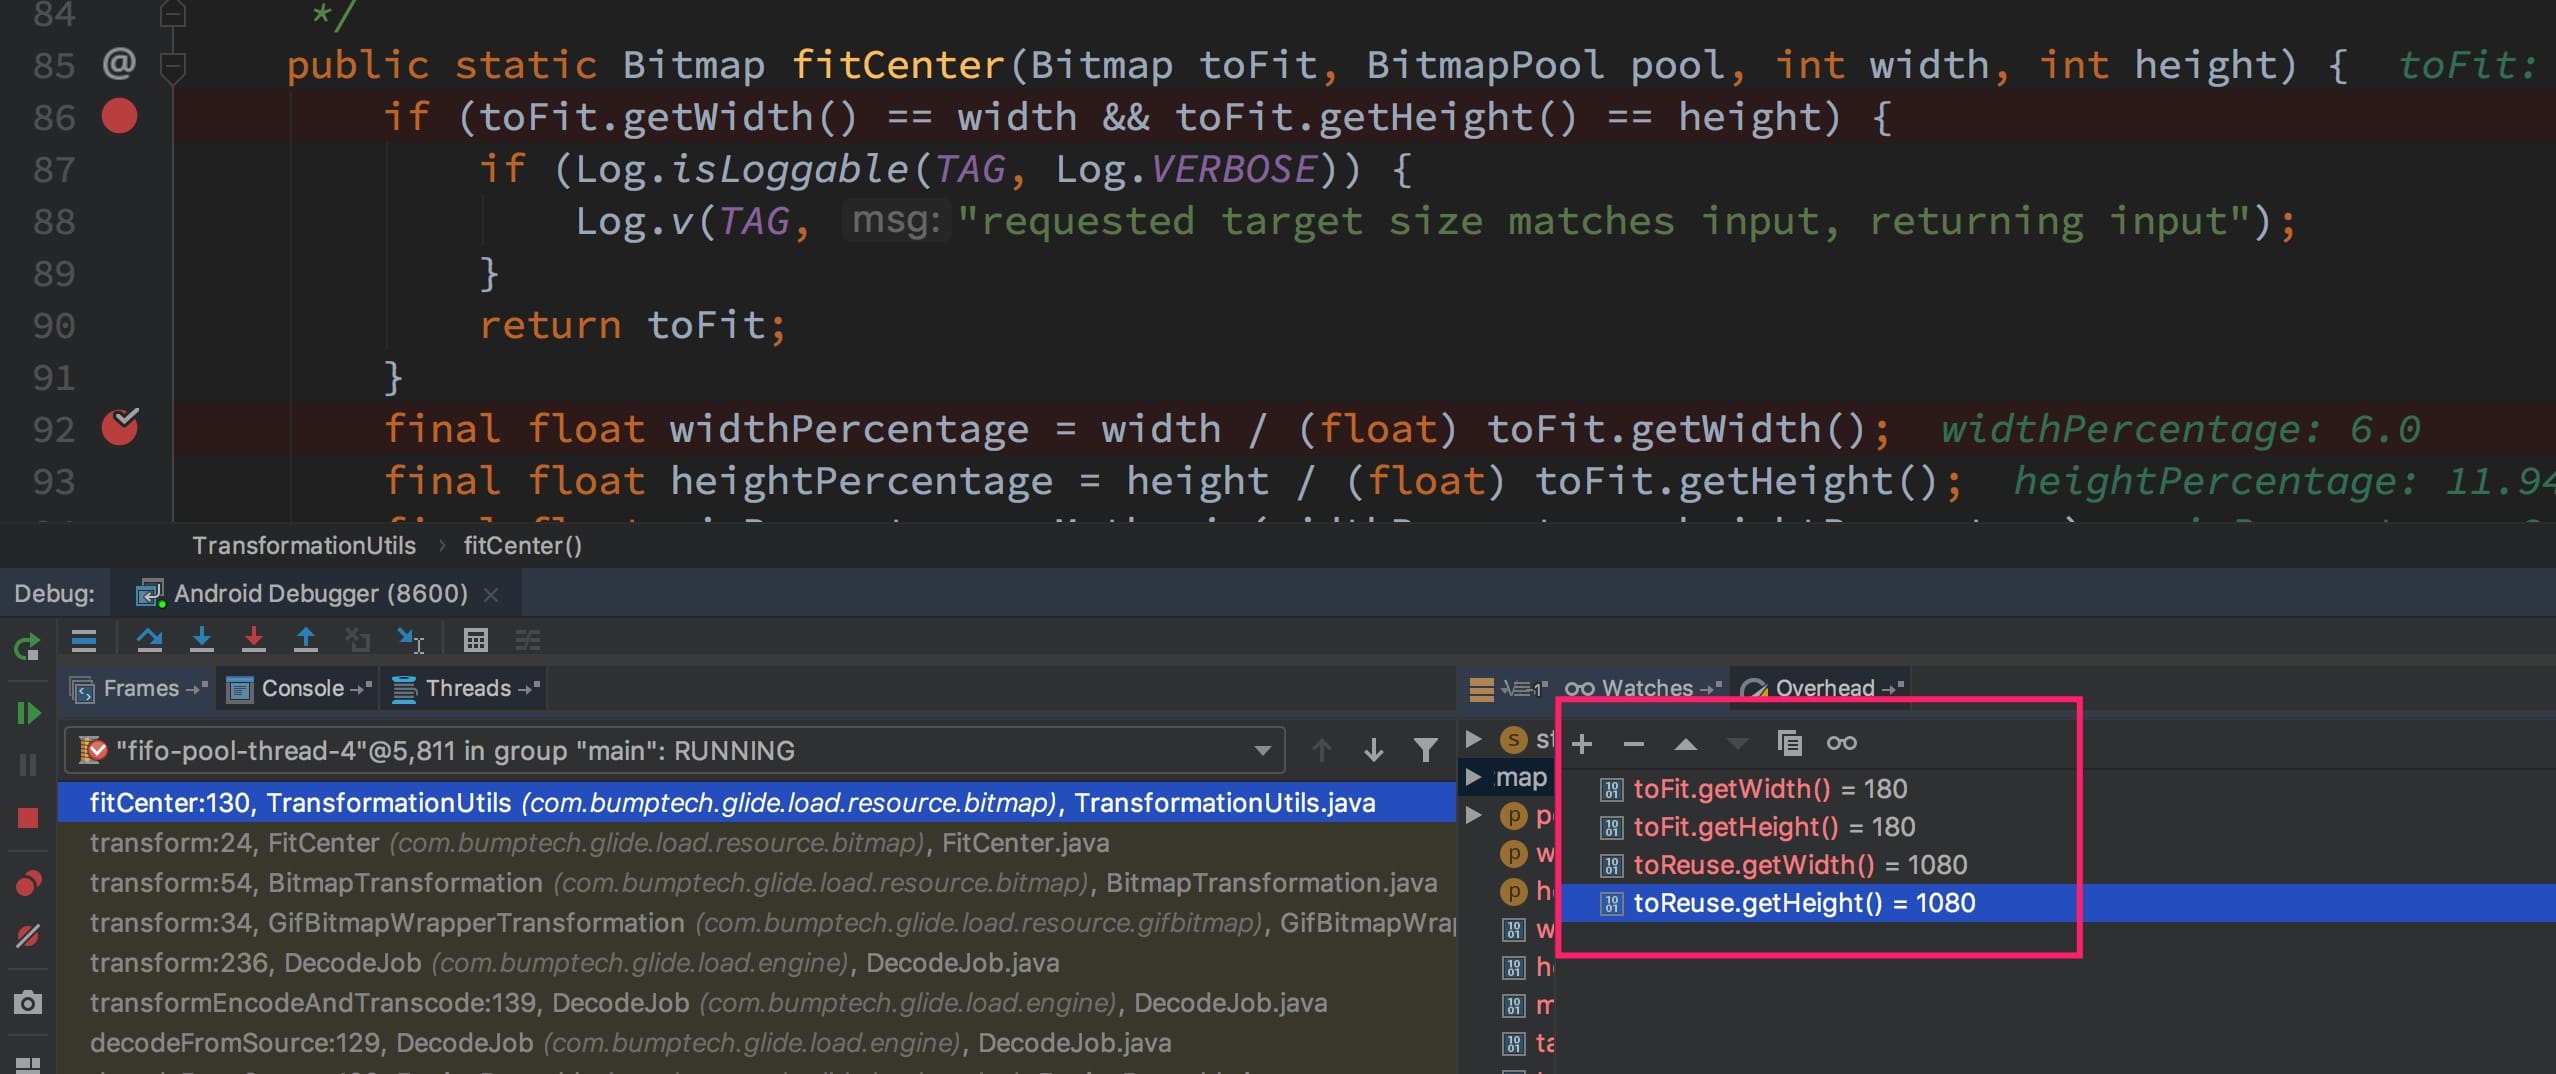
public final class TransformationUtils {
/**
* An expensive operation to resize the given Bitmap down so that it fits within the given dimensions maintain
* the original proportions.
*
* @param toFit The Bitmap to shrink.
* @param pool The BitmapPool to try to reuse a bitmap from.
* @param width The width in pixels the final image will fit within.
* @param height The height in pixels the final image will fit within.
* @return A new Bitmap shrunk to fit within the given dimensions, or toFit if toFit's width or height matches the
* given dimensions and toFit fits within the given dimensions
*/
public static Bitmap fitCenter(Bitmap toFit, BitmapPool pool, int width, int height) {
if (toFit.getWidth() == width && toFit.getHeight() == height) {
return toFit;
}
final float widthPercentage = width / (float) toFit.getWidth();
final float heightPercentage = height / (float) toFit.getHeight();
final float minPercentage = Math.min(widthPercentage, heightPercentage);

// take the floor of the target width/height, not round. If the matrix
// passed into drawBitmap rounds differently, we want to slightly
// overdraw, not underdraw, to avoid artifacts from bitmap reuse.
final int targetWidth = (int) (minPercentage * toFit.getWidth());
final int targetHeight = (int) (minPercentage * toFit.getHeight());

if (toFit.getWidth() == targetWidth && toFit.getHeight() == targetHeight) {
return toFit;
}

Bitmap.Config config = getSafeConfig(toFit);
Bitmap toReuse = pool.get(targetWidth, targetHeight, config);
if (toReuse == null) {
toReuse = Bitmap.createBitmap(targetWidth, targetHeight, config);
}
// We don't add or remove alpha, so keep the alpha setting of the Bitmap we were given.
TransformationUtils.setAlpha(toFit, toReuse);

Canvas canvas = new Canvas(toReuse);
Matrix matrix = new Matrix();
matrix.setScale(minPercentage, minPercentage);
Paint paint = new Paint(PAINT_FLAGS);
canvas.drawBitmap(toFit, matrix, paint);

return toReuse;
}
}

TransformationUtils.fitCenter() 将传入的 toFit 转换成 toReuse

-w1278

然而断点看一下发现 toFit 大小是 180x180,toReuse 大小是 1080x1080。简单算一下,可知之前看到的那个 4MB 的 Bitmap 正是这里的 toReuse

1
1080 * 1080 * 4 / 1024 = 4556.3 KB

到这里,基本可以看出问题原因:

  • Glide 认为 wrap_content 的 ImageView 大小为 1080x2150
  • Glide 先将大小为 180x180 的图片 decode 成 180x180 的 Bitmap,之后又该 Bitmap transform 成 1080x1080 的 Bitmap

Transformation

为什么有 transformation

前文提到过,Glide 的磁盘缓存对象也是 transform 后的 Bitmap,这样通常可以更省存储空间,并且之后读取磁盘缓存性能也更好。

DecodeJob 相关代码如下:

1
2
3
4
5
6
7
8
9
10
11
12
13
14
15
16
17
18
19
20
21
22
23
24
25
26
27
28
29
30
31
32
33
public Resource<Z> decodeFromSource() throws Exception {
Resource<T> decoded = decodeSource();
return transformEncodeAndTranscode(decoded);
}

private Resource<Z> transformEncodeAndTranscode(Resource<T> decoded) {
long startTime = LogTime.getLogTime();
Resource<T> transformed = transform(decoded);
if (Log.isLoggable(TAG, Log.VERBOSE)) {
logWithTimeAndKey("Transformed resource from source", startTime);
}

writeTransformedToCache(transformed);

startTime = LogTime.getLogTime();
Resource<Z> result = transcode(transformed);
if (Log.isLoggable(TAG, Log.VERBOSE)) {
logWithTimeAndKey("Transcoded transformed from source", startTime);
}
return result;
}

private void writeTransformedToCache(Resource<T> transformed) {
if (transformed == null || !diskCacheStrategy.cacheResult()) {
return;
}
long startTime = LogTime.getLogTime();
SourceWriter<Resource<T>> writer = new SourceWriter<Resource<T>>(loadProvider.getEncoder(), transformed);
diskCacheProvider.getDiskCache().put(resultKey, writer);
if (Log.isLoggable(TAG, Log.VERBOSE)) {
logWithTimeAndKey("Wrote transformed from source to cache", startTime);
}
}

Transformation 策略

Transformation 的选择策略见 GenericRequestBuilder,源码如下。

1
2
3
4
5
6
7
8
9
10
11
12
13
14
15
16
17
18
19
20
21
22
23
24
25
26
27
28
29
30
31
32
33
34
35
36
37
38
39
40
41
42
43
44
45
46
47
48
49
50
51
52
53
54
/**
* Transform resources with the given {@link Transformation}s. Replaces any existing transformation or
* transformations.
*
* @param transformations the transformations to apply in order.
* @return This request builder.
*/
public GenericRequestBuilder<ModelType, DataType, ResourceType, TranscodeType> transform(
Transformation<ResourceType>... transformations) {
isTransformationSet = true;
if (transformations.length == 1) {
transformation = transformations[0];
} else {
transformation = new MultiTransformation<ResourceType>(transformations);
}

return this;
}

/**
* Removes the current {@link com.bumptech.glide.load.Transformation}.
*
* @return This request builder.
*/
@SuppressWarnings("unchecked")
public GenericRequestBuilder<ModelType, DataType, ResourceType, TranscodeType> dontTransform() {
Transformation<ResourceType> transformation = UnitTransformation.get();
return transform(transformation);
}

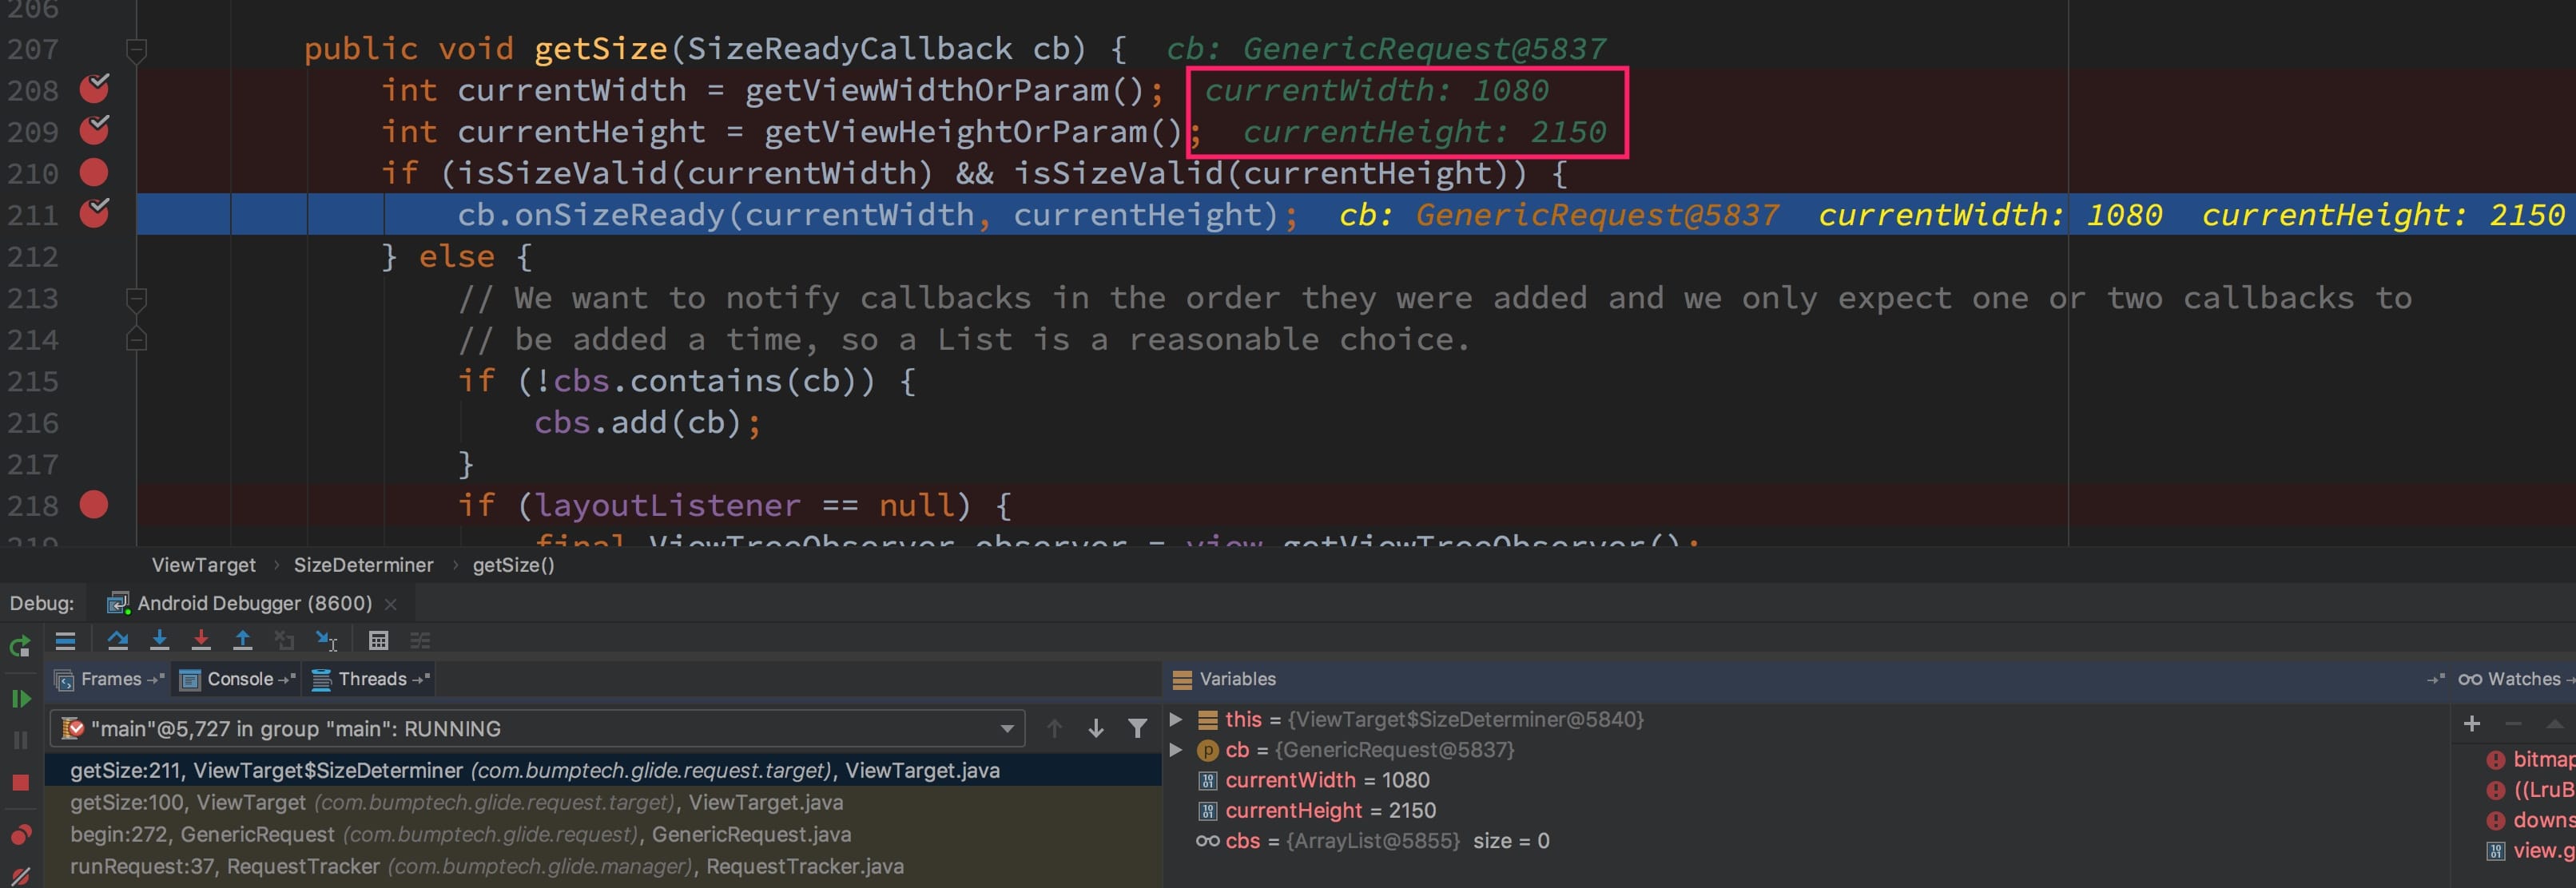
public Target<TranscodeType> into(ImageView view) {
Util.assertMainThread();
if (view == null) {
throw new IllegalArgumentException("You must pass in a non null View");
}

if (!isTransformationSet && view.getScaleType() != null) {
switch (view.getScaleType()) {
case CENTER_CROP:
applyCenterCrop();
break;
case FIT_CENTER:
case FIT_START:
case FIT_END:
applyFitCenter();
break;
//$CASES-OMITTED$
default:
// Do nothing.
}
}

return into(glide.buildImageViewTarget(view, transcodeClass));
}
  • 默认是基于 ImageViewscaleType 自动选择 transformation
    • CENTER_CROP 时选择 CenterCrop
    • FIT_CENTER, FIT_START, FIT_END 时选择 FitCenter
    • 其他情况使用默认的 UnitTransformation
  • 如果 GenericRequestBuilder.transform() 方法指定了 transformation,则优先使用这个 transformation

用户可以调用 GenericRequestBuilder.dontTransform() 方法来禁用 transform 操作。dontTransform() 实际上是调用 transform() 方法来指定 UnitTransformation 作为 transformation。UnitTransformation 并不进行任何操作,而是直接返回原始的 Bitmap。

总结

对于大小为 wrap_content 的 ImageView,Glide 会”误认为”其大小为屏幕大小,所以可能将一个原本较小地图片错误地 transform 成一个较大的 Bitmap,从而引起不必要的内存开销。

建议使用 Glide 时不要将 ImageView 的大小设置为 wrap_content。以这个布局中的 iv_tag 为例,

1
2
3
4
5
6
7
8
<ImageView
android:scaleType="fitStart"
android:id="@+id/iv_tag"
android:layout_width="wrap_content"
android:layout_height="wrap_content"
android:layout_alignStart="@id/iv_bg"
android:layout_alignTop="@id/iv_bg"
/>

考虑到这个图片的实际大小为 180x180 像素,

如果将 iv_tag 大小由 wrap_content 修改为 60dp

  • 在华为 nova 2 (3倍屏) 上不再生成一个额外的大小为 4MB 的 Bitmap
  • 其他非3倍屏的手机上仍然会有一个额外的 Bitmap,但大小仅几十KB到几百KB

至此,应用内存轻松减少 4MB,问题解决!