使用Gradle构建工具非常方便,我们可以快速地添加第三方库依赖。那么如何发布自己的库?
实际项目中又分成两种情况。一种是将自己的库发布到第三方搭建的Maven库(比如公司内部Maven库),另一种情况是发布到官网(比如jCenter)。下面分别讨论。
发布到第三方库 这里以发布到我们公司内部的Maven库为例,发布到其他第三方Maven库应该类似。
发布 使用maven-publish插件发布 在待发布的module的build.gradle中添加配置:
1 2 3 4 5 6 7 8 9 10 11 12 13 14 15 16 17 18 19 20 21 22 23 24 25 26 27 apply plugin: 'maven-publish' publishing { publications { mavenJava(MavenPublication) { from components.java } } repositories { maven { credentials { username "$mavenUser" password "$mavenPassword" } url { "http://my.org/repo" } } } }
配好之后运行gradle publish即可将生成的内容上传到指定的Maven库。
1
2
3
4
5
6
7
8
9
10
11
12
13
14
15
16
17
18
gradlew publish Parallel execution is an incubating feature. Upload http://my.org/repo/com/test/viky-test/1.0-SNAPSHOT/viky-test-1.0-20180206.111742-6.jar Upload http://my.org/repo/com/test/viky-test/1.0-SNAPSHOT/viky-test-1.0-20180206.111742-6.jar.sha1 Upload http://my.org/repo/com/test/viky-test/1.0-SNAPSHOT/viky-test-1.0-20180206.111742-6.jar.md5 Upload http://my.org/repo/com/test/viky-test/1.0-SNAPSHOT/viky-test-1.0-20180206.111742-6.pom Upload http://my.org/repo/com/test/viky-test/1.0-SNAPSHOT/viky-test-1.0-20180206.111742-6.pom.sha1 Upload http://my.org/repo/com/test/viky-test/1.0-SNAPSHOT/viky-test-1.0-20180206.111742-6.pom.md5 Upload http://my.org/repo/com/test/viky-test/1.0-SNAPSHOT/maven-metadata.xml Upload http://my.org/repo/com/test/viky-test/1.0-SNAPSHOT/maven-metadata.xml.sha1 Upload http://my.org/repo/com/test/viky-test/1.0-SNAPSHOT/maven-metadata.xml.md5 Upload http://my.org/repo/com/test/viky-test/maven-metadata.xml Upload http://my.org/repo/com/test/viky-test/maven-metadata.xml.sha1 Upload http://my.org/repo/com/test/viky-test/maven-metadata.xml.md5 BUILD SUCCESSFUL in 3s 4 actionable tasks: 4 executed
注意:不要忘记在gradle.properties中配置Maven库的用户名密码:
1
2
mavenUser=your_username mavenPassword=your_password
否则可能出现类似下面这样的未授权问题:
1
2
3
4
5
* What went wrong: Execution failed for task ':publishMavenJavaPublicationToMavenRepository'. > Failed to publish publication 'mavenJava' to repository 'maven' > Could not write to resource 'http://my.org/repo/com/test/viky-test/1.0-SNAPSHOT/viky-test-1.0-20180206.093919-5.jar'. > Could not PUT 'http://my.org/repo/com/test/viky-test/1.0-SNAPSHOT/viky-test-1.0-20180206.093919-5.jar'. Received status code 401 from server: Unauthorized
使用maven插件发布 也可以直接使用maven插件而不是maven-publish插件。maven插件配置起来可能相对更简单。
首先在module的build.gradle中添加maven plugin。
1 apply plugin: 'maven-publish'
然后在build.gradle中添加一个新的taskuploadArchives。
1
2
3
4
5
6
7
8
9
10
11
12
uploadArchives { repositories { mavenDeployer { repository(url: 'http://my.org/repo' ){ authentication(userName: 'your_username' , password: 'your_password' ) pom.groupId = 'com.yourcompany.yourpackage' pom.artifactId = 'yourart' pom.version = '1.0.0-SNAPSHOT' } } } }
运行gradle uploadArchives将生成的内容上传到指定的Maven库。
使用自己发布的库 在repositories中添加了Maven库地址后,我们就可以像使用第三方库一样引用自己发布的库了。
添加仓库:
1
2
3
4
5
6
7
8
allprojects { repositories { maven { url "http://my.org/repo" } } }
添加依赖:
1 compile 'com.yourcompany.yourpackage:yourart:1.0.0-SNAPSHOT'
发布到jCenter jCenter是由bintray.com维护的Maven仓库。
如何使用Android Studio把自己的Android library分发到jCenter和Maven Central | 开发技术前线 一文中有比较详情的描述,但是我按照文中提到的方法尝试很久仍然不能成功将自己的库发布到jCenter。所以建议直接使用bintray-plugin 提供的例子来实践,但操作前一定要把README 多看几遍,否则可能踩坑。
下载代码 首先下载bintray-examples 代码。
1 git clone https://github.com/bintray/bintray-examples.git
注意,官方的例子更新并不及时。以examples中的gradle-aar-example为例,它使用的gradle版本是2.2.1,所以按照官网说明 我们应当将对build.gradle脚本的buildscript部分用到bintray-plugin的地方进行修改,否则后续操作可能失败。
修改前的代码
1
2
3
4
5
6
7
8
9
10
11
12
13
buildscript { repositories { jcenter() } dependencies { classpath 'com.android.tools.build:gradle:1.0.0' classpath 'com.jfrog.bintray.gradle:gradle-bintray-plugin:1.0' classpath 'com.github.dcendents:android-maven-plugin:1.2' } }
修改后的代码
1
2
3
4
5
6
7
8
9
10
11
12
13
14
15
16
buildscript { repositories { jcenter() } dependencies { classpath 'com.android.tools.build:gradle:1.0.0' classpath 'com.github.dcendents:android-maven-plugin:1.2' } } plugins { id "com.jfrog.bintray" version "1.7.3" }
申请bintray账号 具体步骤在些略过,可以参考如何使用Android Studio把自己的Android library分发到jCenter和Maven Central | 开发技术前线 第一部分。
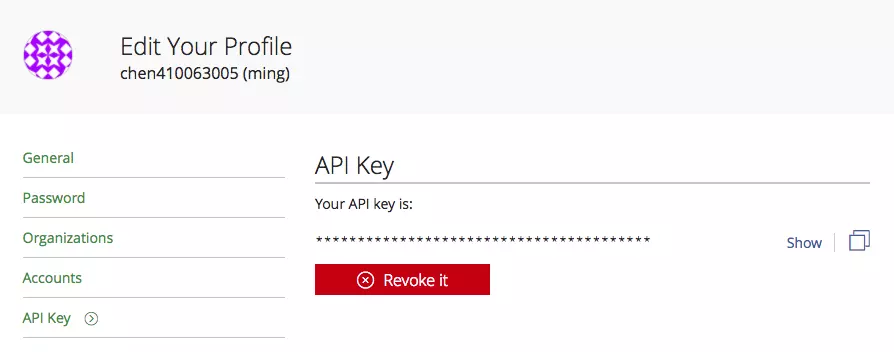
我们会用到bintray的账号名以及API Key。可以在 Edit Profit 中找到 API Key:
配置bintray插件 修改build.gradle中的bintray部分。
1
2
3
4
5
6
7
8
9
10
11
12
13
14
15
16
17
18
bintray { user = "chen410063005" key = "**************" configurations = ['archives' ] pkg { repo = 'tt' name = 'wee' userOrg = 'sunmoon' desc = 'Bintray aar publishing example' websiteUrl = siteUrl issueTrackerUrl = 'https://github.com/bintray/bintray-examples/issues' vcsUrl = gitUrl licenses = ['Apache-2.0' ] labels = ['aar' , 'android' , 'example' ] publicDownloadNumbers = true } }
user - 你的bintray用户名
key - 你的API Key
repo - Repo name
name - Package name
userOrg - 你的bintray账号所属的组织
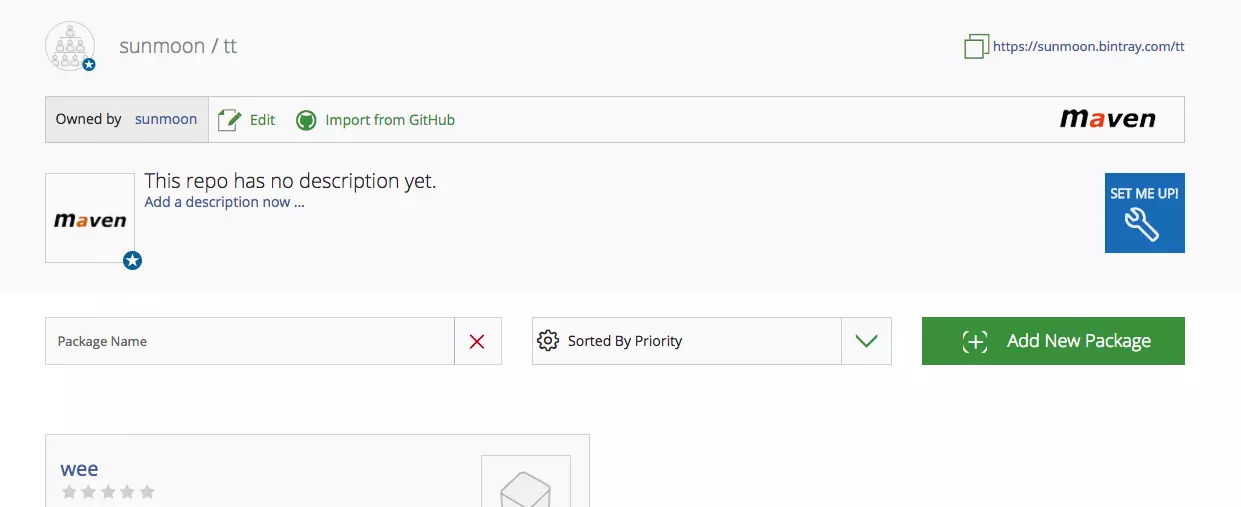
以上几个字段需要跟你的bintray账号相对应。以我的账号为例,截图如下:
发布 配置无误后gradle bintrayUpload即可将aar文件上传到bintray
记得要在bintray中将新上传的文件状态修改为发布状态才能正常下载。
使用 添加仓库:
1
2
3
4
5
repositories { maven { url "https://sunmoon.bintray.com/tt" } }
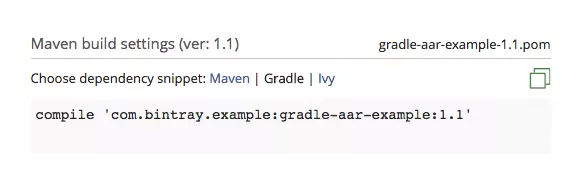
添加依赖:compile 'com.bintray.example:gradle-aar-example:1.1'
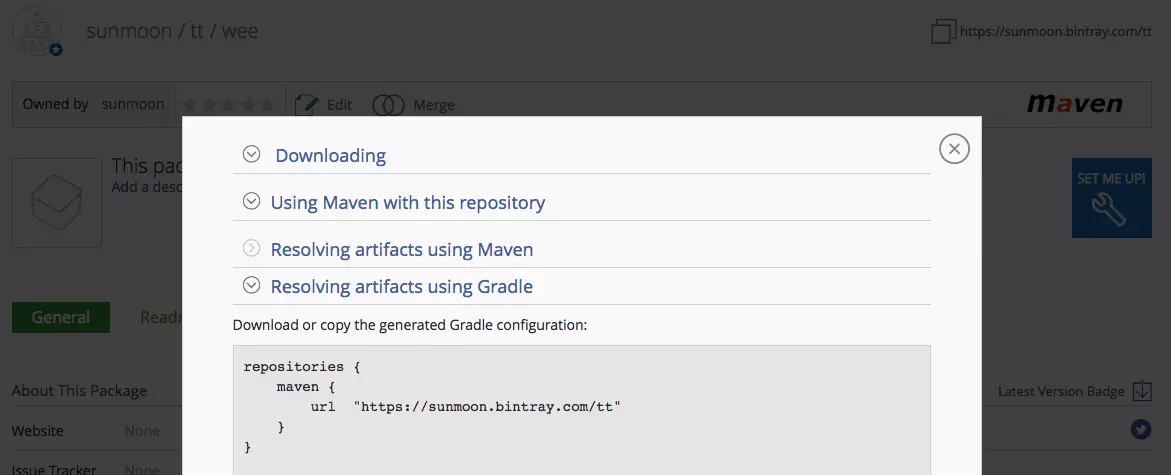
容易忘记如何添加仓库和添加依赖。不用担心,bintray网站中有详情的引导告诉我们如何操作,见这里的截图。
添加仓库。点”set me up” -> “Resolving artifacts using Gradle”
添加依赖。在”Maven build settings”中将Maven切换到Gradle
这个进度条是不是很熟悉?build.gradle脚本变动后gradle正在下载我自己上传的库文件,说明我们可以从jCenter找到自己发布的库了!
参考